I get it. Upgrading your Ubuntu version is incredibly intimidating — Particularly if you aren't well versed in the Linux CLI (Command Line Interface) yet.
Don't panic!
Upgrading to 22.04 LTS (Long Term Support) from an earlier release is actually rather simple when you know what you're doing!
This guide will take you through all the steps needed to upgrade Ubuntu from 20.04 to 22.04 LTS using the command line.
Before we begin:
Before we begin with the upgrade, you'll need to look over the following requirements. If there's anything missing, make sure you implement this before going any further!
- Minimum of 20 GB of free disk space. (You can check this using the df command.)
- Ensure you have a regular user configured with sudo privileges with access to SSH or the terminal app. (This is the user you're going to use to perform the upgrade!)
- In addition, ensure you have a fast and stable internet connection. (Remember: You should not cancel this operation once it has started.)
- If you are upgrading your own physical server, ensure your UPS/ battery is fully charged and working properly!
- Close all open applications.
Step 1: Backing up your data:
As mentioned, upgrading your Ubuntu version is a straight forward endeavour, however, this doesn't mean that we don't have to have a plan B.
Before you begin the upgrade process, please ensure that you have backed up all of your files and databases. If anything goes wrong during the upgrade, you won't have to worry about losing any important data!
The majority of web hosts offer some form of backup or snapshot feature. If you are running a virtual machine or cloud VPS, ensure that you have utilised this feature to create a snapshot that you can restore from should anything go wrong!
Warning:
Do not continue with this guide until you have a snapshot in place!
Step 2: Updating currently installed system packages
Once you ensure that your backups are in place, and you can restore from them, you can start upgrading the system packages.
This will upgrade the entire system to the latest Ubuntu release to ensure that the difference between your packages is small as possible.
To list upgradable packages, run the command:
$ sudo apt list --upgradable
Now that we have a list of upgradable packages, you will need to refresh the local package index and upgrade the packages. This can be condensed into a single command:
$ sudo apt update && sudo apt upgrade -y
Depending on the number of packages you have installed, this could take a bit of time to complete.
Once the upgrade is finished, we suggest rebooting the system with the following command:
$ sudo reboot
This will allow us to utilise the latest kernel that comes with the upgrade!
Step 3: Verify your currently installed Ubuntu Version
When your server has finished rebooting, log into the system and confirm it has been upgraded to the latest release using the following command:
$ lsb_release -a

Step 4: Opening port 1022
Thus far, we have been upgrading our server using an SSH connection and chances are, you are too.
As you likely know, the default SSH port is port 22. During the upgrade, Ubuntu will automatically open an additional SSH port on 1022. This is done to give you an additional secure channel to connect to your server should an error occur.
Now, to ensure that this port can actually be opened, you will need to ensure that port 1022 isn't currently blocked on your server. Once you've checked that it hasn't been blocked, you can explicitly open it using the following command:
sudo ufw allow 1022/tcp

Step 5: Upgrading to Ubuntu 22.04
We've now gone through all of the prerequisite work to begin our upgrade, and everything should be in place to ensure it is successful.
The last step is to actually upgrade your Ubuntu version by running the following command:
sudo do-release-upgrade -d
When you enter this command, you will see the following notice:
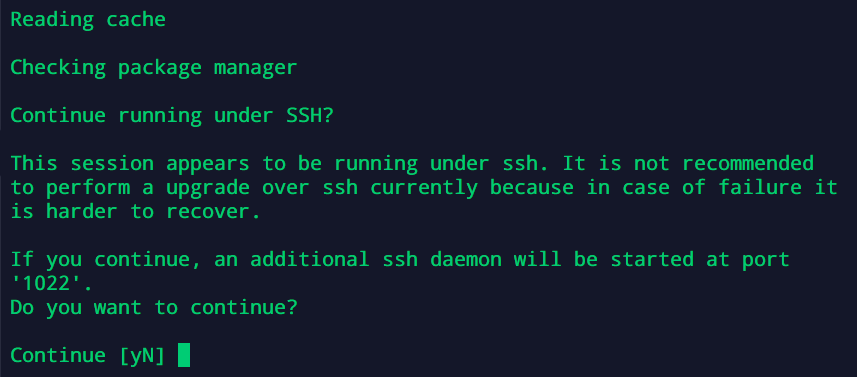
You can confirm this by typing Y and pressing Enter.
You will then receive an additional notice:
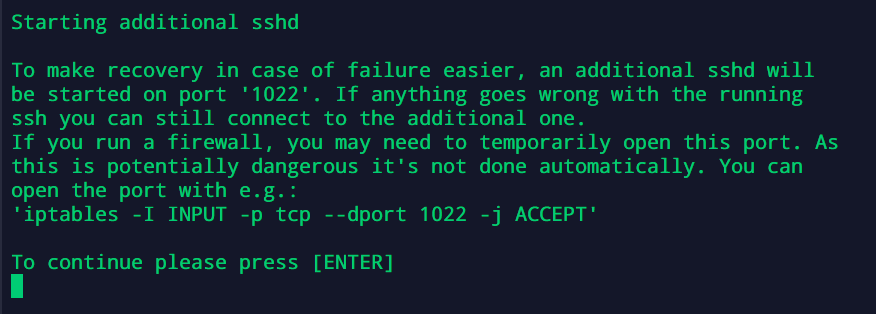
You can confirm this by pressing Enter.
Your server will now connect to the Ubuntu 22.04 package repository to gather the necessary information to perform the upgrade.
When this is complete, you will see the following upgrade summary:

To confirm the upgrade, once again type Y and press Enter.
Your server will begin to download the packages needed for the upgrade. This step can take quite some time so be patient!
You will receive a prompt asking if you would like your server's services to be restarted automatically throughout the upgrade:
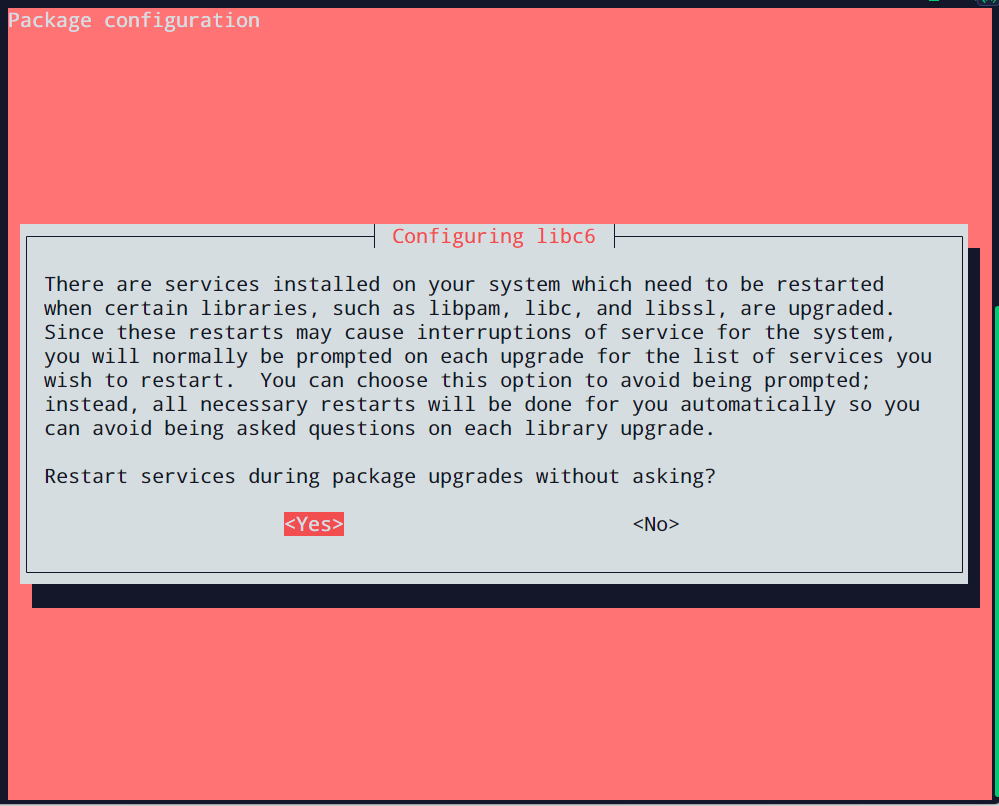
I would recommend choosing Yes. Once you have made your choice, press Enter to continue the upgrade.
If you have made any changes to any system or service configuration files, you will be asked whether you wish to preserve these or replace them with the new configuration files included with Ubuntu 22.04.
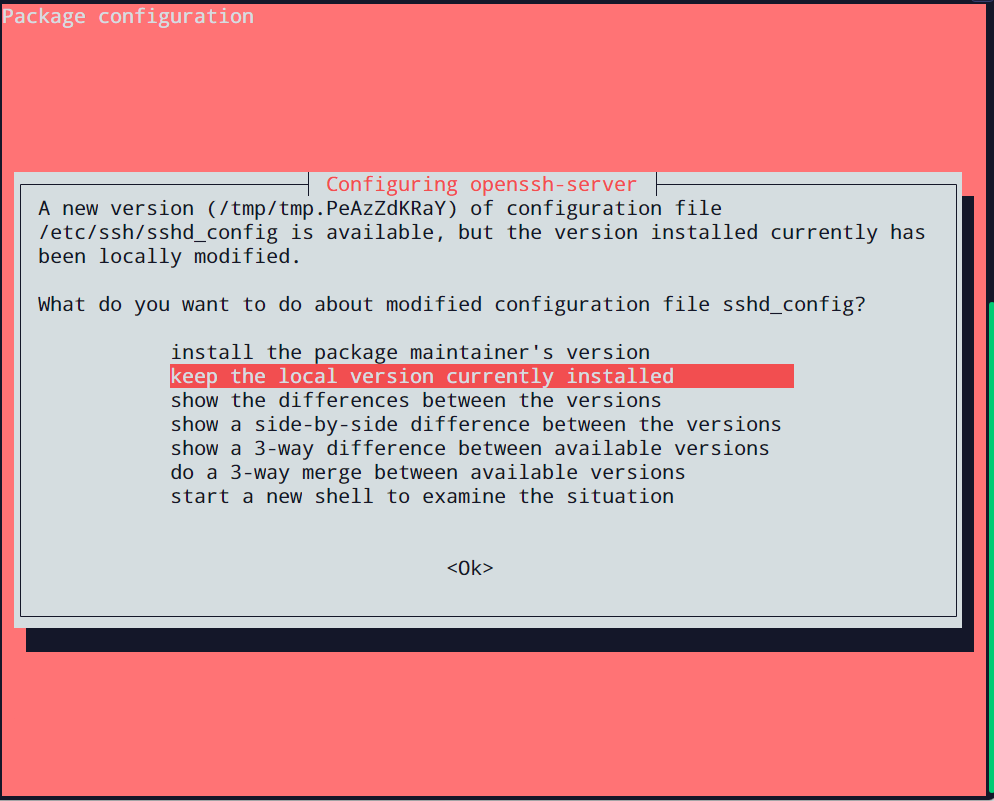
To proceed, select the option you would prefer and press Enter.
Finally, you will be asked if you would like the obsolete packages to be automatically removed from the system:
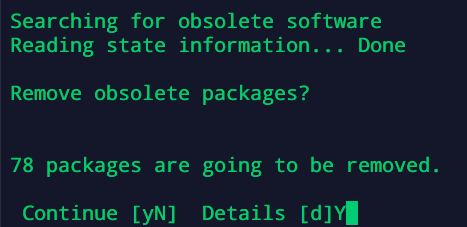
As you no longer need these, you should type Y to confirm this and then press Enter.
Your upgrade should now be complete. You will receive the following prompt advising you that the server should be restarted to complete the upgrade process:
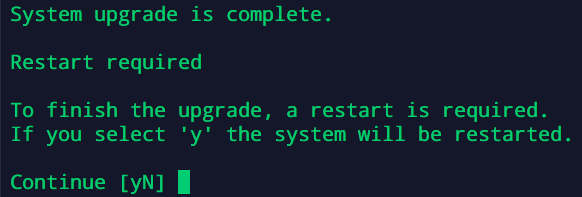
To confirm the reboot, type Y and press Enter.
Step 6: Confirming the upgrade
Once your system has rebooted, you should use SSH to connect to the upgraded system to ensure that the upgrade has been successful. You can do this using the same command that we used at the start of this guide:
lsb_release -a

Congratulations!
Your Ubuntu version has now been upgraded to 22.04 and you can enjoy all of the perks that come with your newly upgraded system. The final step is to go through your services and ensure that they are working as expected.
Conclusion
Thats it!
You now know how to upgrade your Ubuntu version to 22.04. At the time of writing, Ubuntu 22.04 (Jammy Jellyfish) is the most recent LTS release. This means it will receive free system updates until April 2027!
Share this article
About the author
Tristan P
I'm Tristan! I'm Krystal's Technical Community Manager and self-proclaimed documentation wizard. When I'm not writing, you'll normally find me playing some form of instrument or harnessing the power of the internet to pretend to drive a truck with my little plastic wheel.