
If you want to speed up your WordPress site (which of course you do!), the free LiteSpeed Cache plugin is one of the best ways to do it.
Despite the name, the LiteSpeed Cache plugin does a lot more than just caching (though it certainly does that). In fact, it's a full WordPress performance plugin, on par with the likes of WP Rocket.
And despite the name again, you actually don't need to be using LiteSpeed Web Server to use the plugin - almost all of the features work with any web server, with the one exception being the page caching feature.
In this article, we're going to do a deep dive into the best LiteSpeed Cache settings to speed up your WordPress site.
If you're hosting at Krystal or our Managed WordPress hosting, you'll be able to benefit from every single feature because we use LiteSpeed Web Server on all our plans.
If you're hosting somewhere that doesn't use LiteSpeed Web Server, you'll still be able to benefit from most of these settings - just not the page caching. Or, you can always let us migrate your site to Krystal for free to take advantage of everything LiteSpeed Web Server has to offer.
Ready to dig in? Here's how to configure LiteSpeed Cache with the best settings...
How to Configure LiteSpeed Cache to Speed Up WordPress
The LiteSpeed Cache plugin is available for free at WordPress.org, so you can install it just like you would any other plugin.
Once you activate it, you'll get a new LiteSpeed Cache area in your WordPress dashboard. We'll go through each submenu in order, starting with the Cache settings.
For all these settings, these are just recommended starting points. Your site might have unique needs, so feel free to configure things differently if needed.
Cache
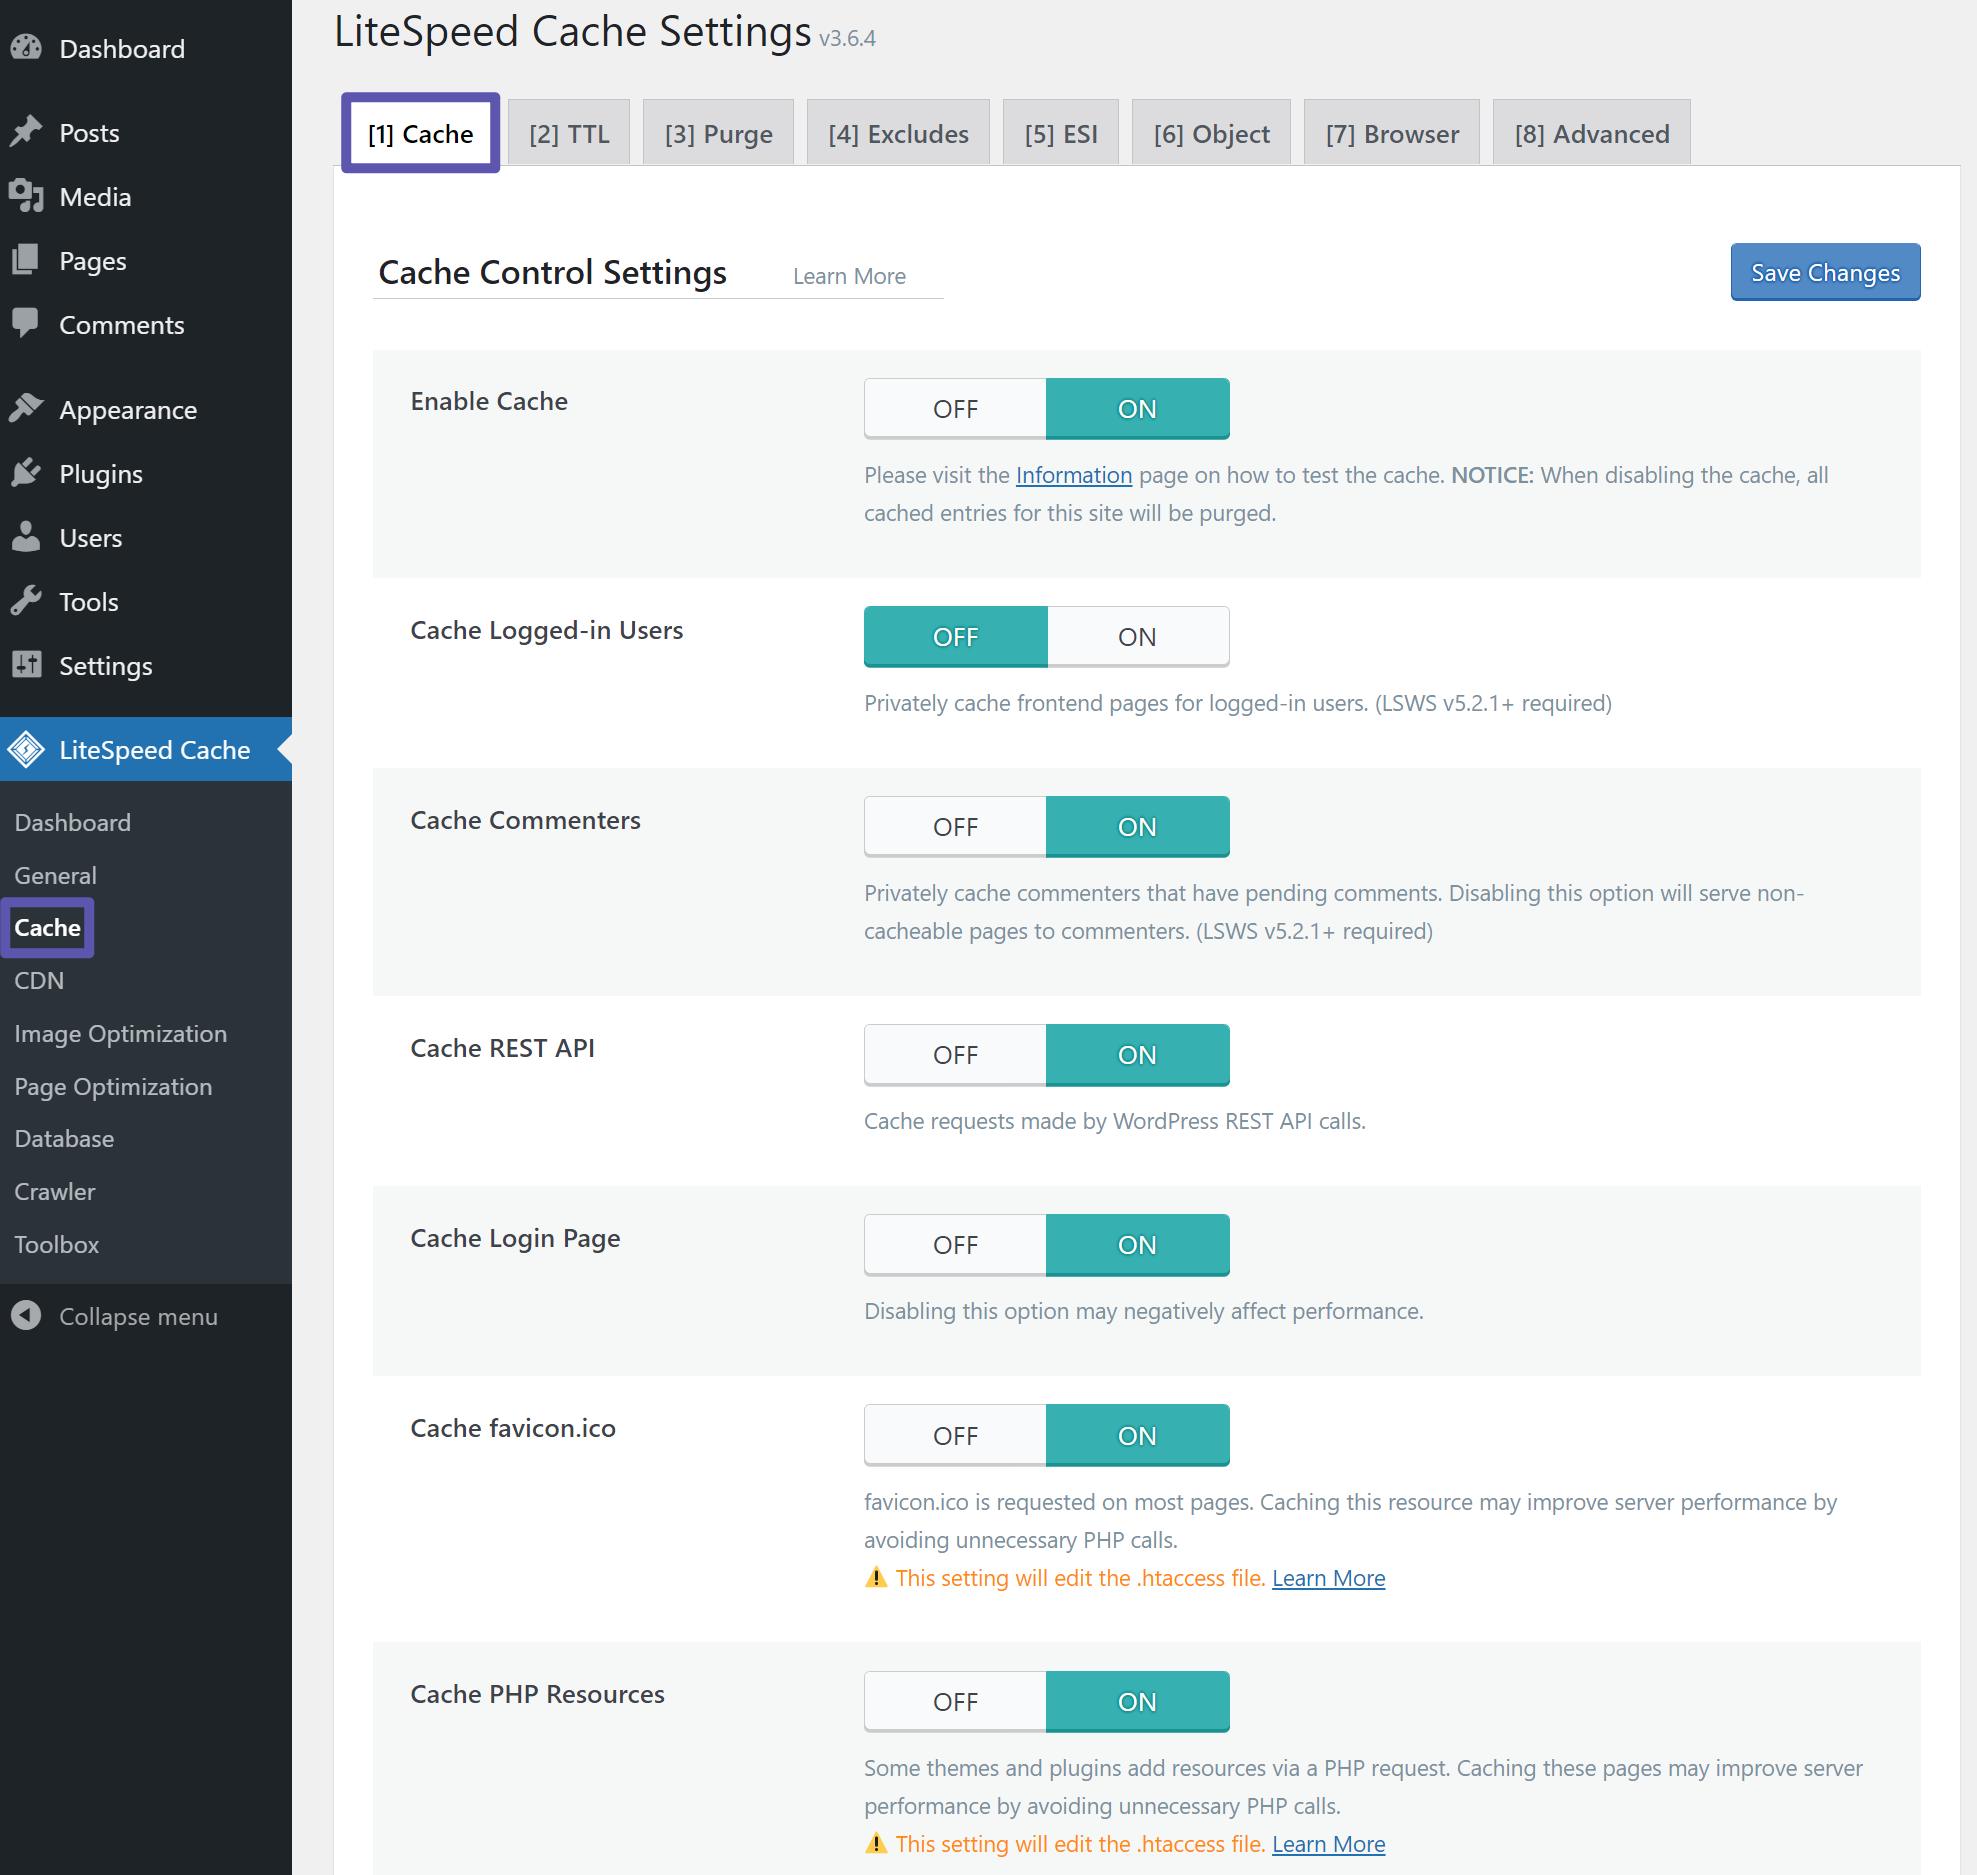
Let's start out in the Cache tab. Unsurprisingly, this tab helps you configure how caching functions on your site. Most of these features are focused on page caching, but you'll also get options for browser caching and object caching.
Cache
In the main cache tab, you'll want to make sure that Enable Cache is set to On.
Other than that, most sites should be fine with the defaults.
One default setting you might want to turn off is Cache Logged-in Users. This might be useful for small membership sites with unique content for each user, but most sites won't benefit that much.
If you use AMP for mobile or you have mobile-specific content (like a plugin that adds a toolbar or call button exclusively for mobile visitors), you might want to enable Cache Mobile. Regular responsive sites do not need this, though.
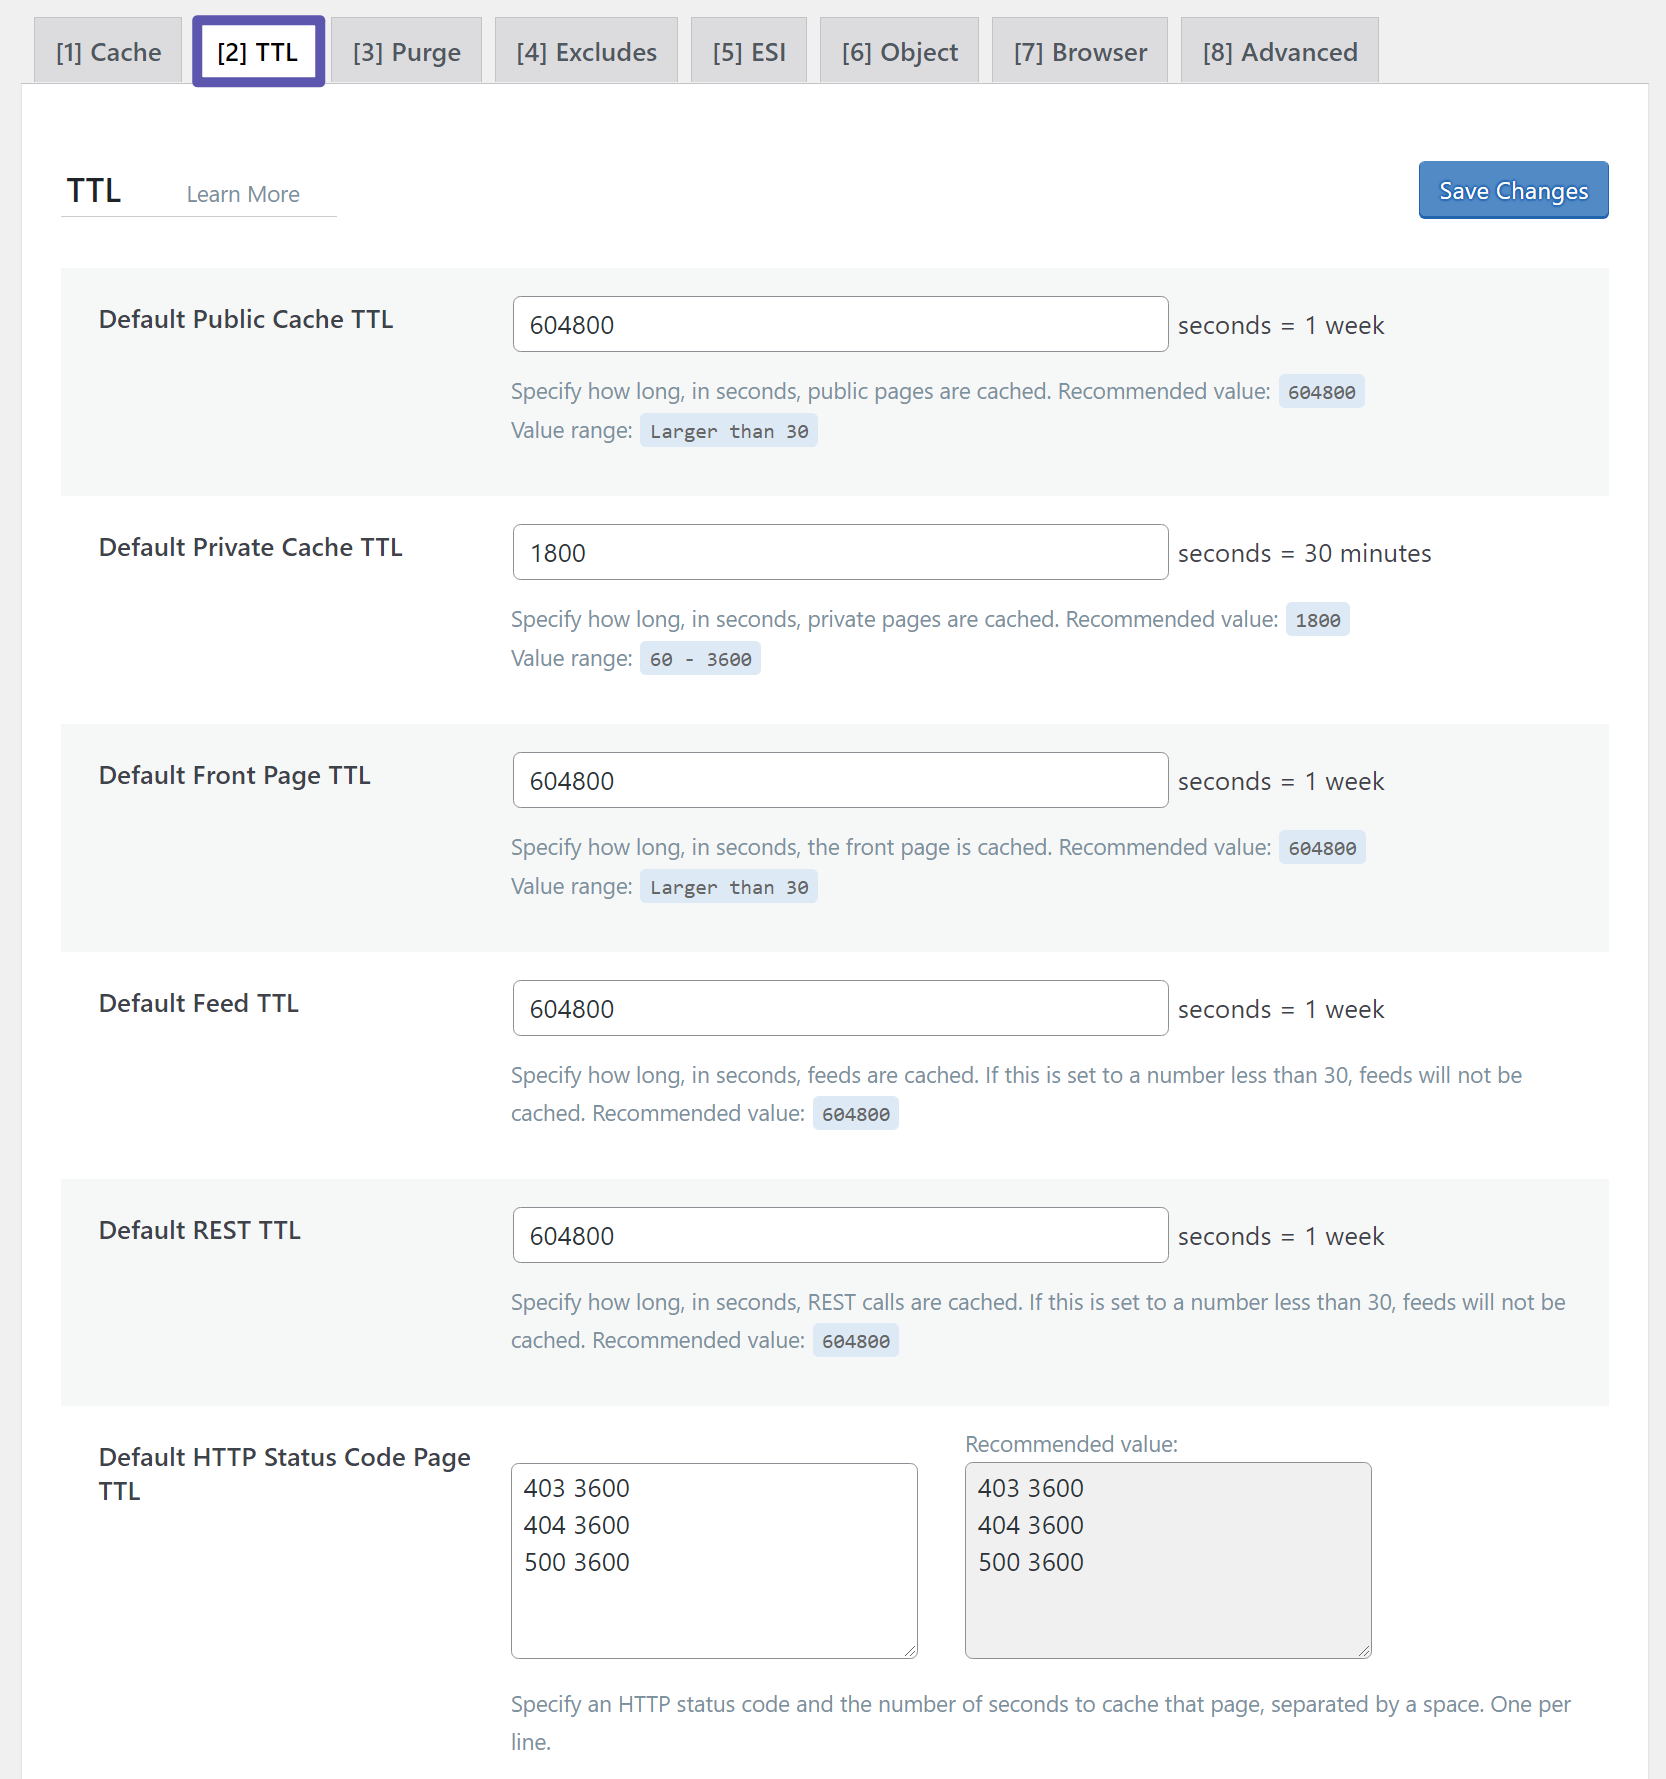
TTL
The TTL tab lets you control how long to cache certain types of content before letting the cache expire (and generating a new cached version).
For most sites, the defaults are fine. However, if you have a 100% static site that never changes, you can increase the duration.
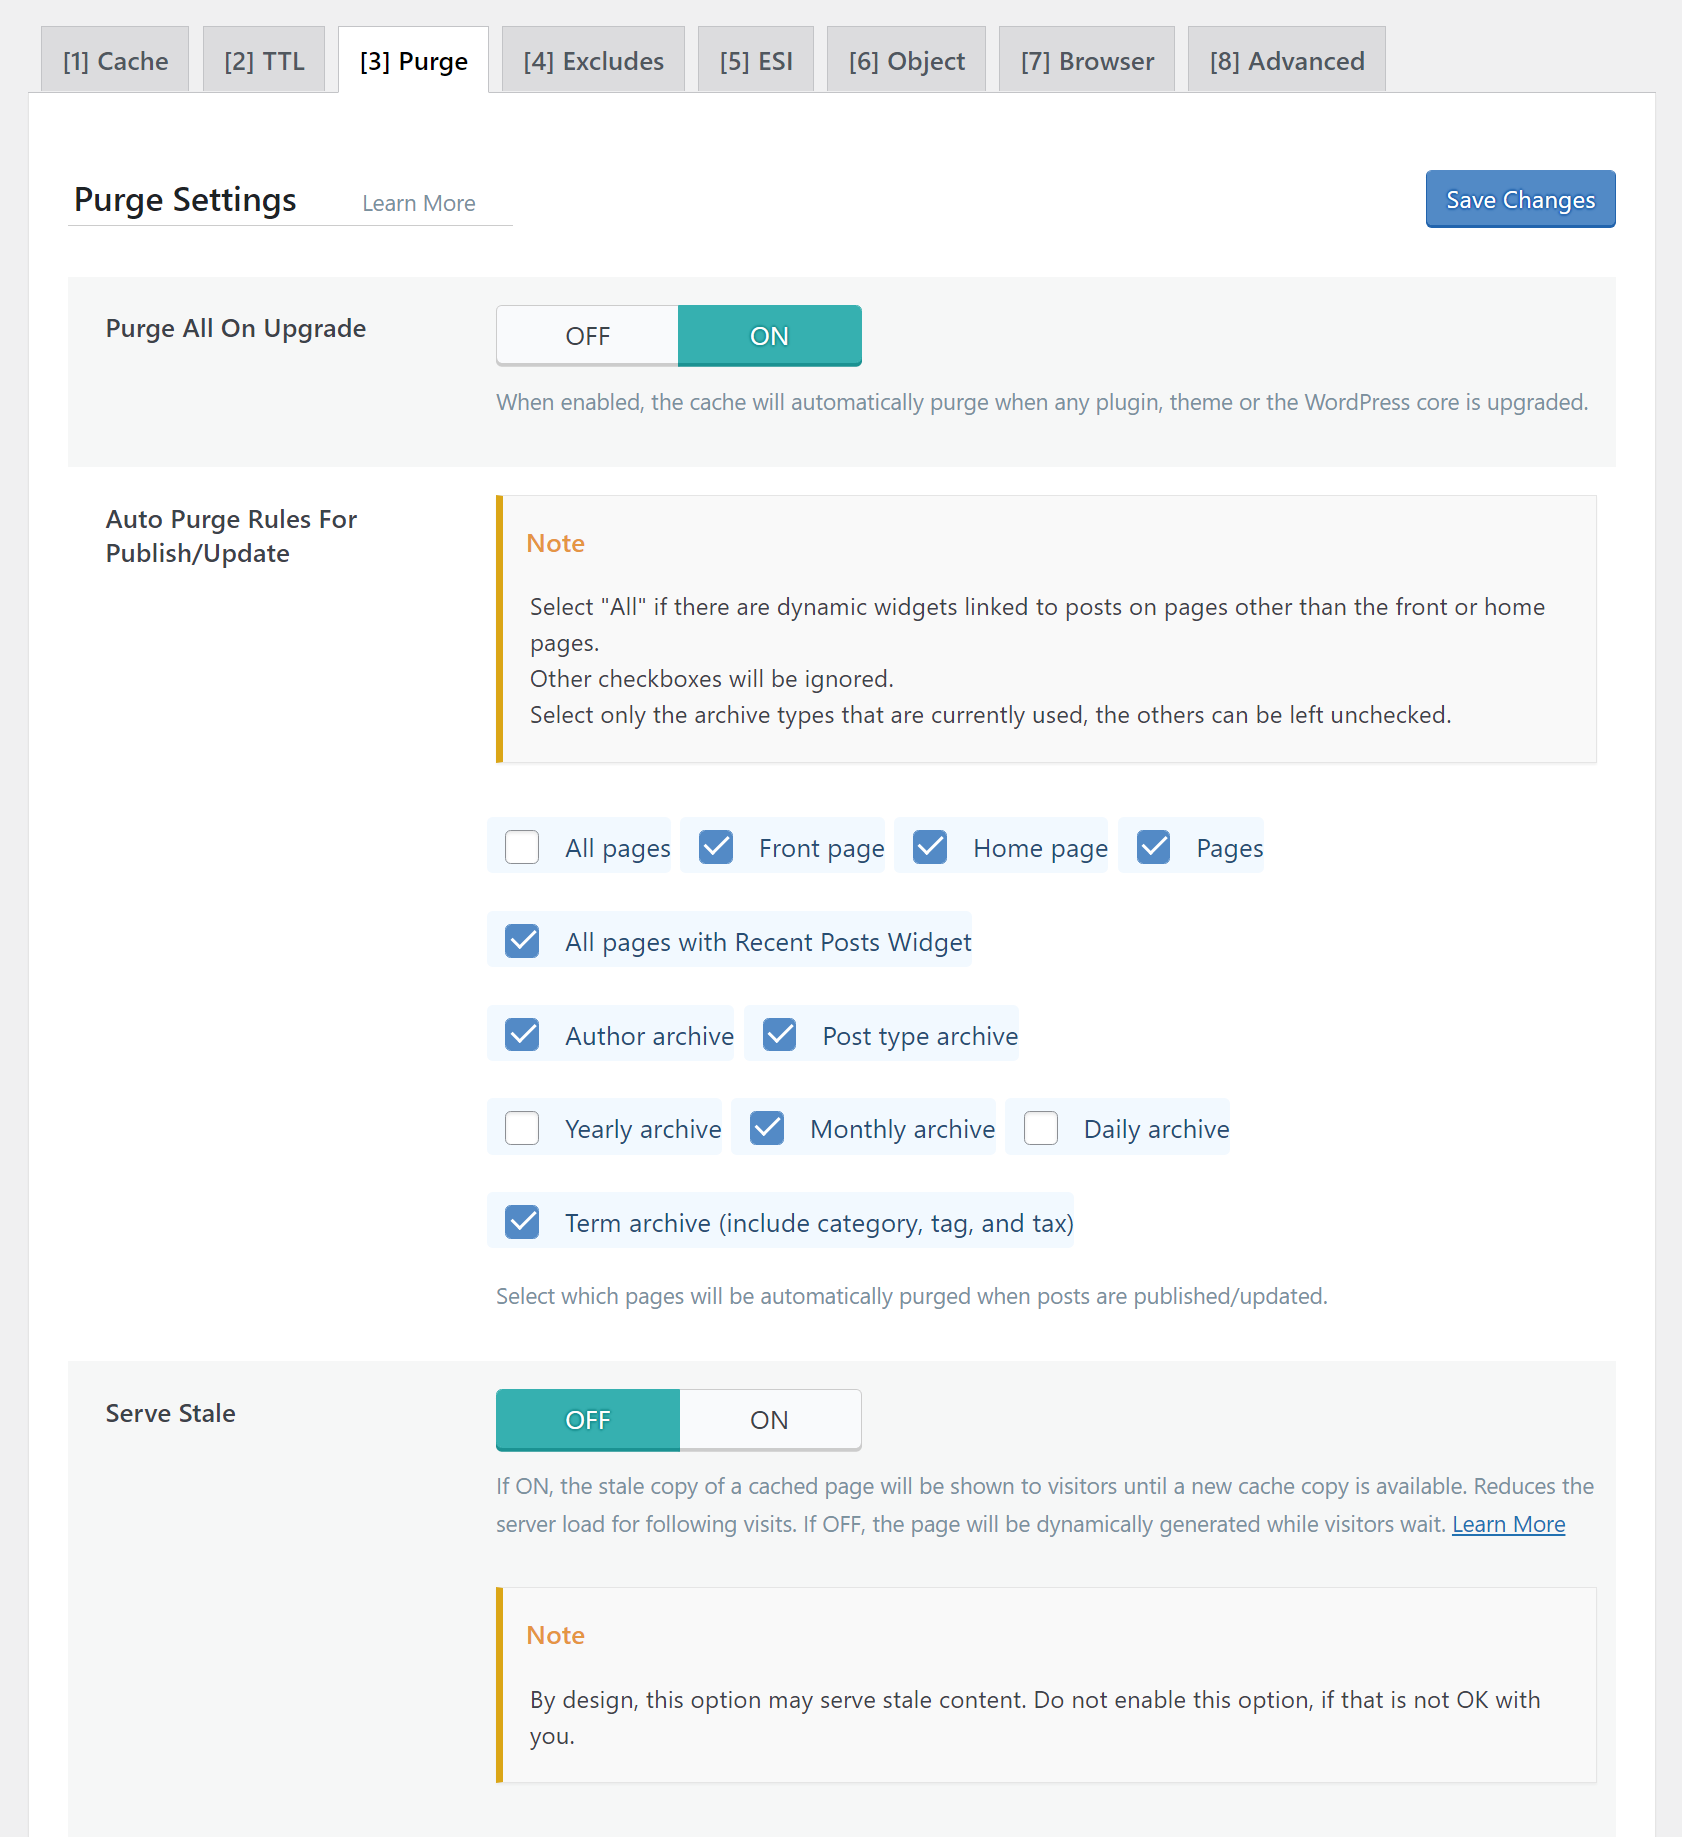
Purge
The Purge tab lets you configure rules for automatically purging your cache. Typically, you'll want to automatically purge the cache when you publish or update new content, which is enabled by default.
Most sites will be fine with the defaults:
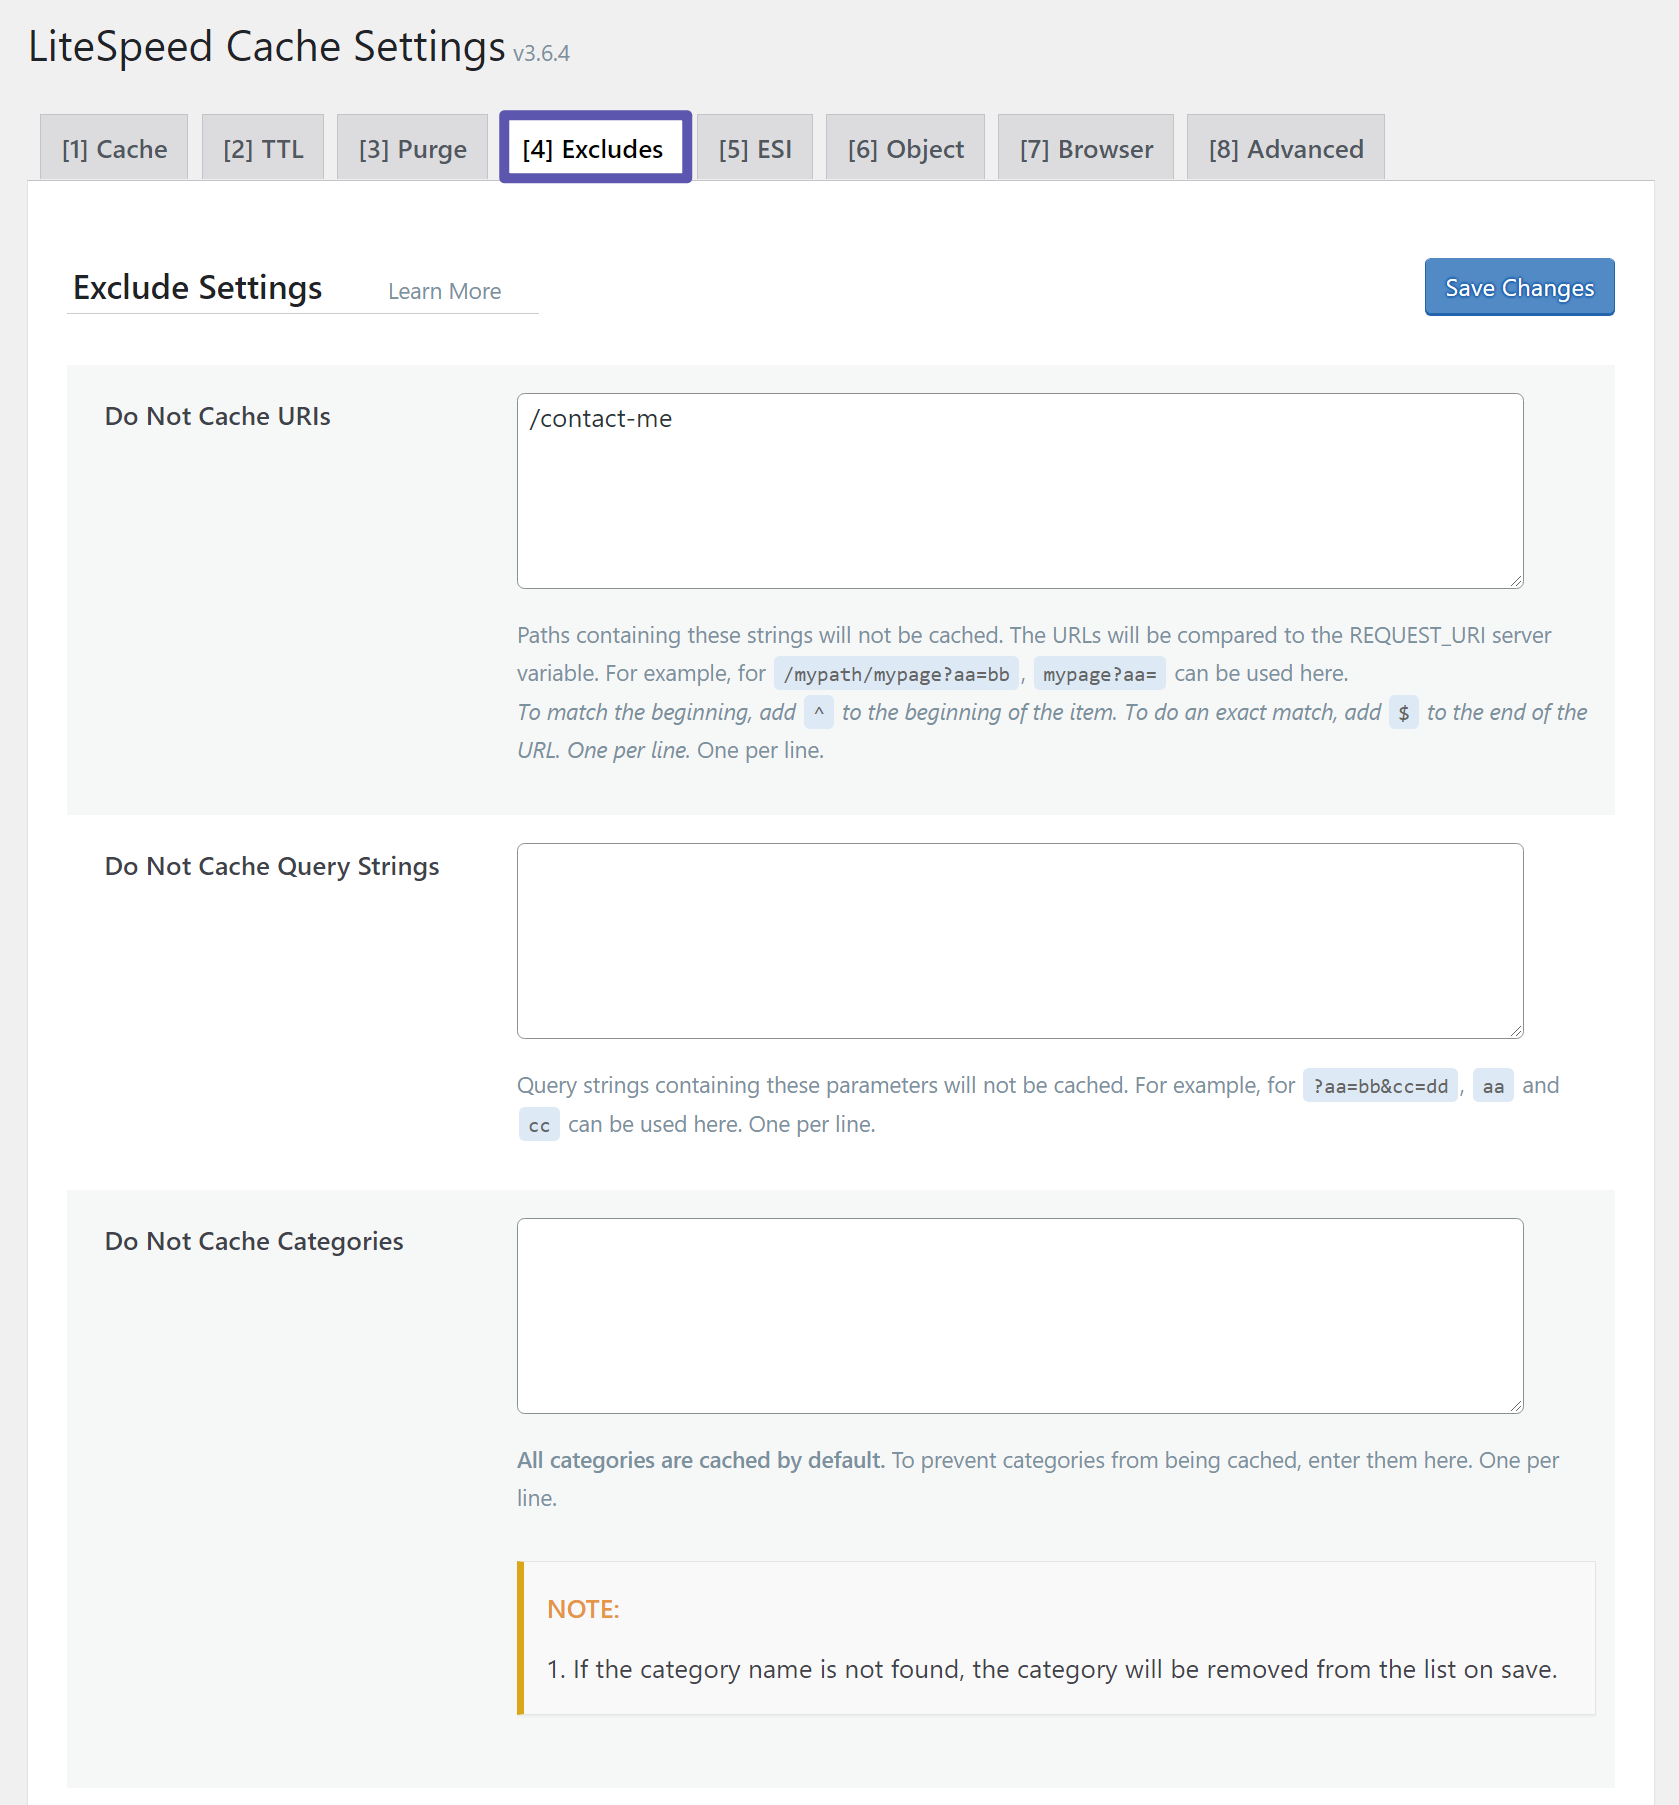
Excludes
The Excludes tab lets you exclude certain content or types of users from seeing cached content.
If you have a contact form, you might want to exclude that URL from being cached because caching can cause issues with some form plugins.
You can set up other exclude rules if needed, but most sites won't need to.
ESI
The ESI tab houses some advanced features - unless you understand what's happening, just leave these as the defaults.
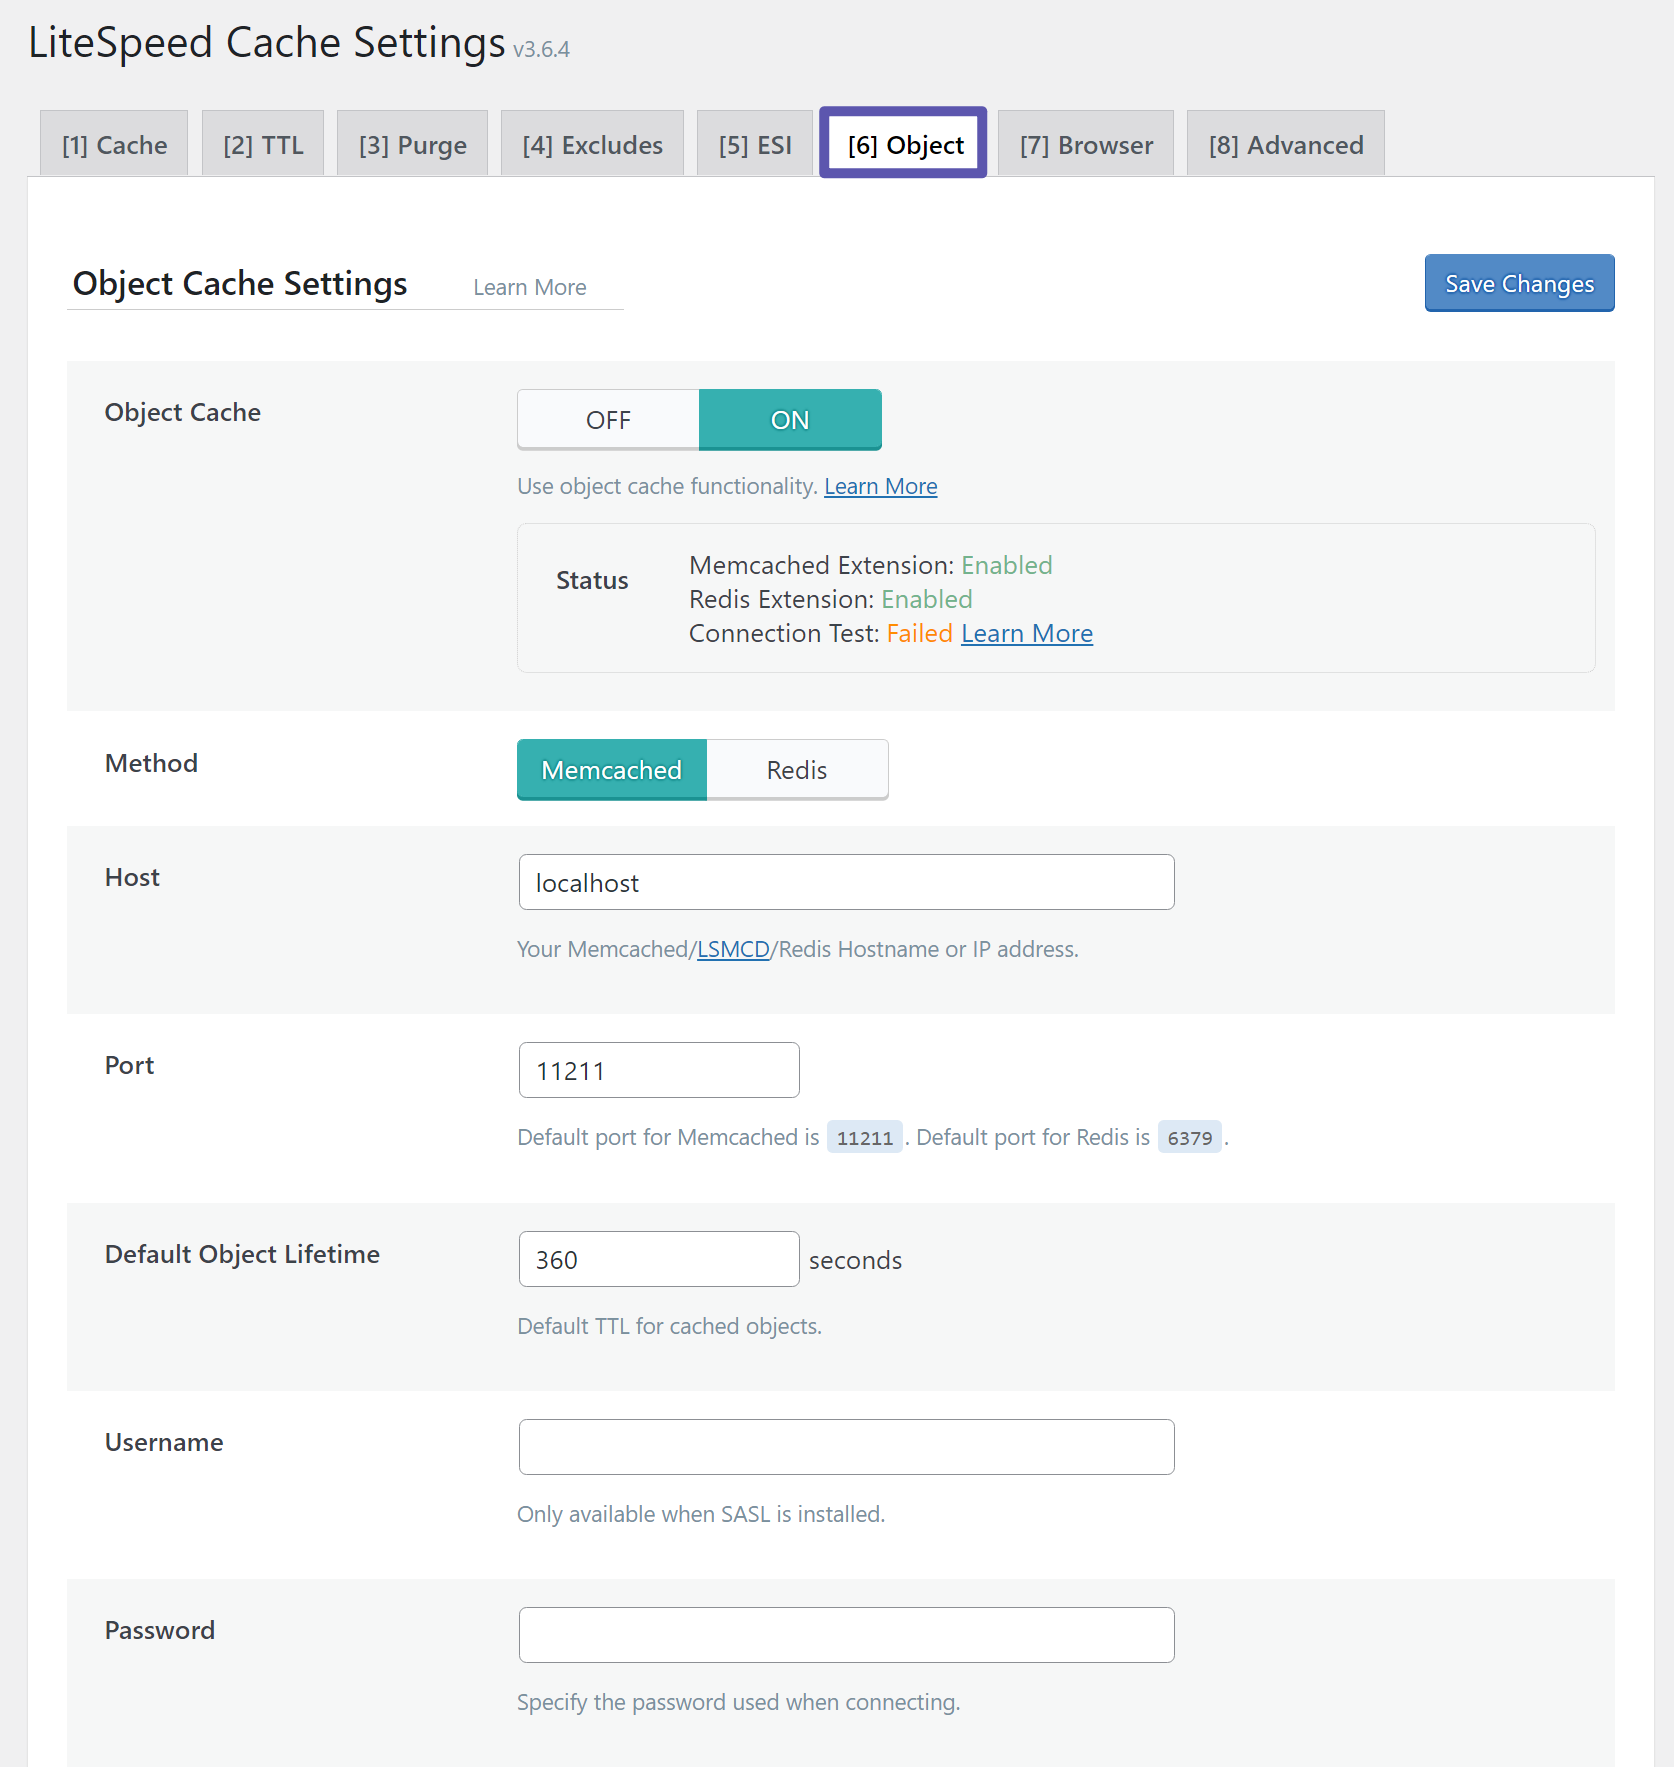
Object
The Object cache tab lets you enable object caching, which is another type of caching that can cache the results of certain database queries (like WordPress site options). However, your server needs to have a dedicated object caching solution like Memcached or Redis to use it.
If your host offers those technologies, you can enable object caching. If your host doesn't, you can reach out to their support for help or just skip object caching.
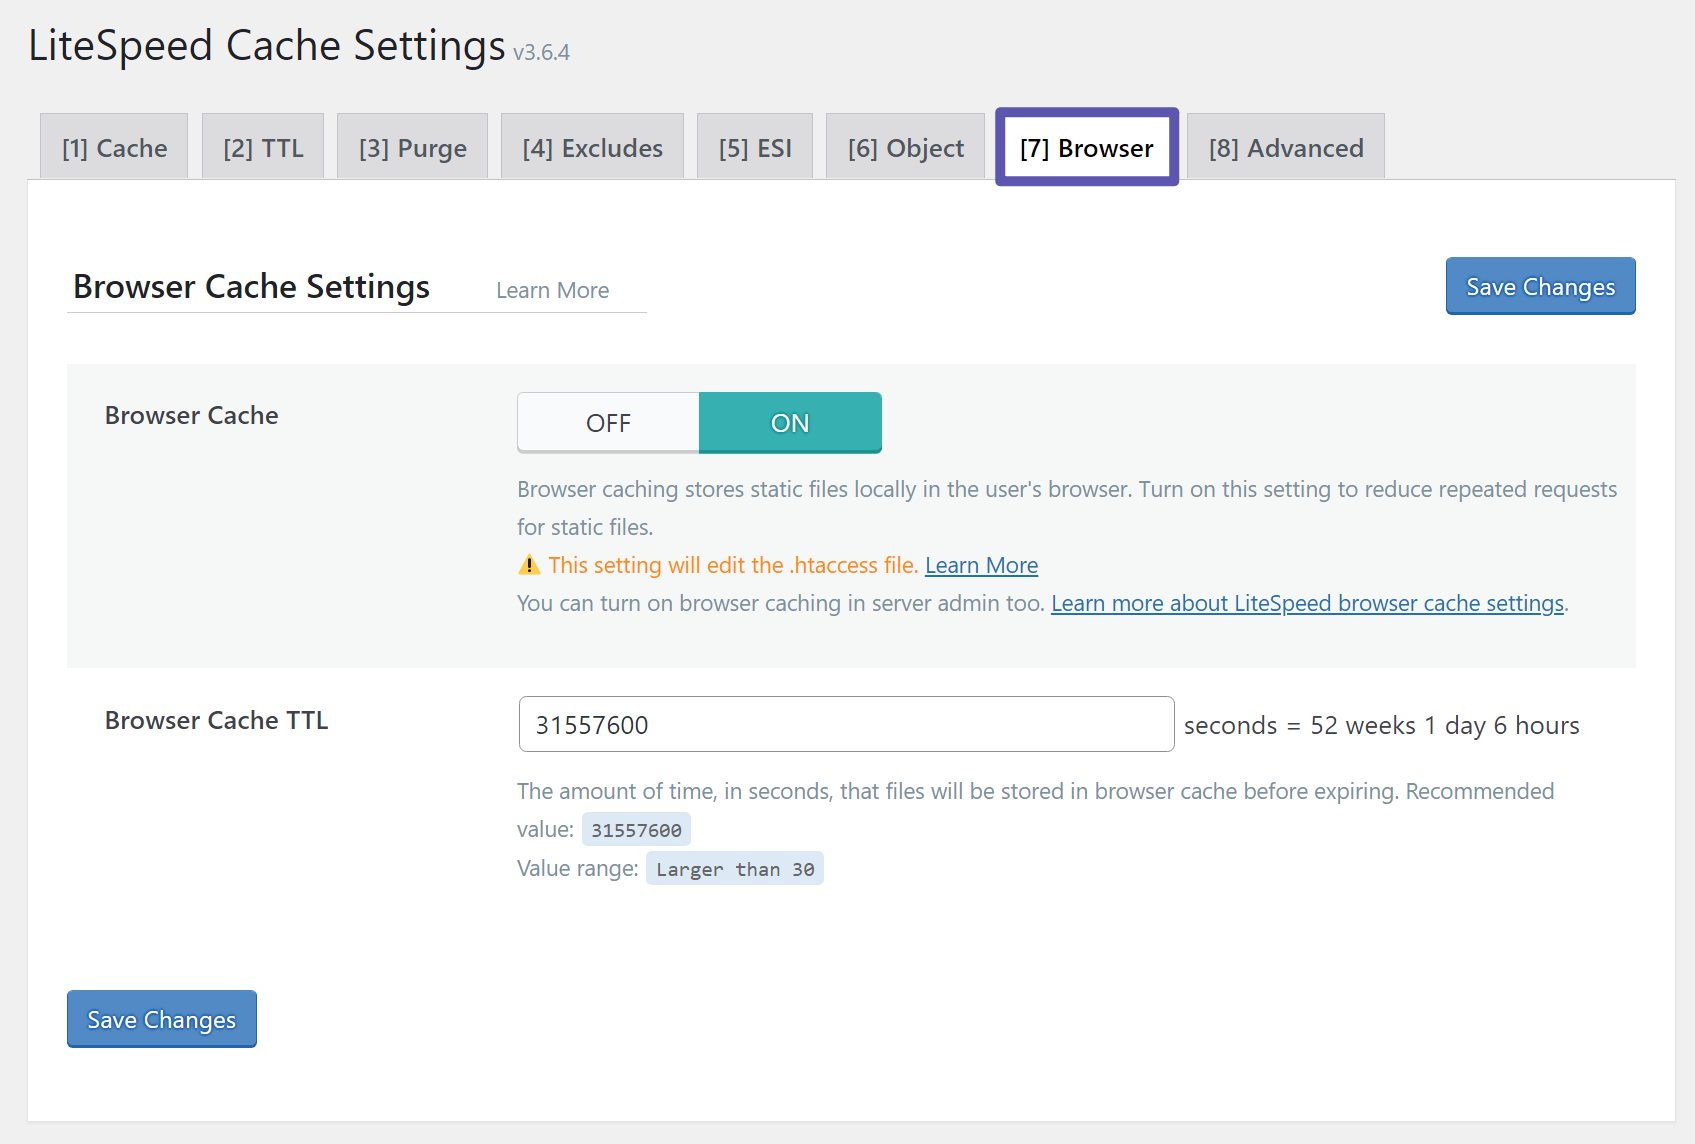
Browser
Browser caching is another useful type of caching that lets you tell visitors' browsers to store static files locally. You should turn this On in the Browser tab:
Advanced
Most people can skip the Advanced tab.
CDN
The CDN tab helps you connect to a content delivery network (CDN) to improve global load times.
LiteSpeed Cache supports traditional CDNs (where you serve content from a subdomain like cdn.yoursite.com) as well as reverse proxy CDNs like Quic.Cloud or Cloudflare.
Basically, if you want to use a CDN, this is where you can set it up. If you don't want to use a CDN, you can skip this section.
If you're looking for a CDN service to use with LiteSpeed Cache, you can use the Krystal CDN starting at just £5 per month.
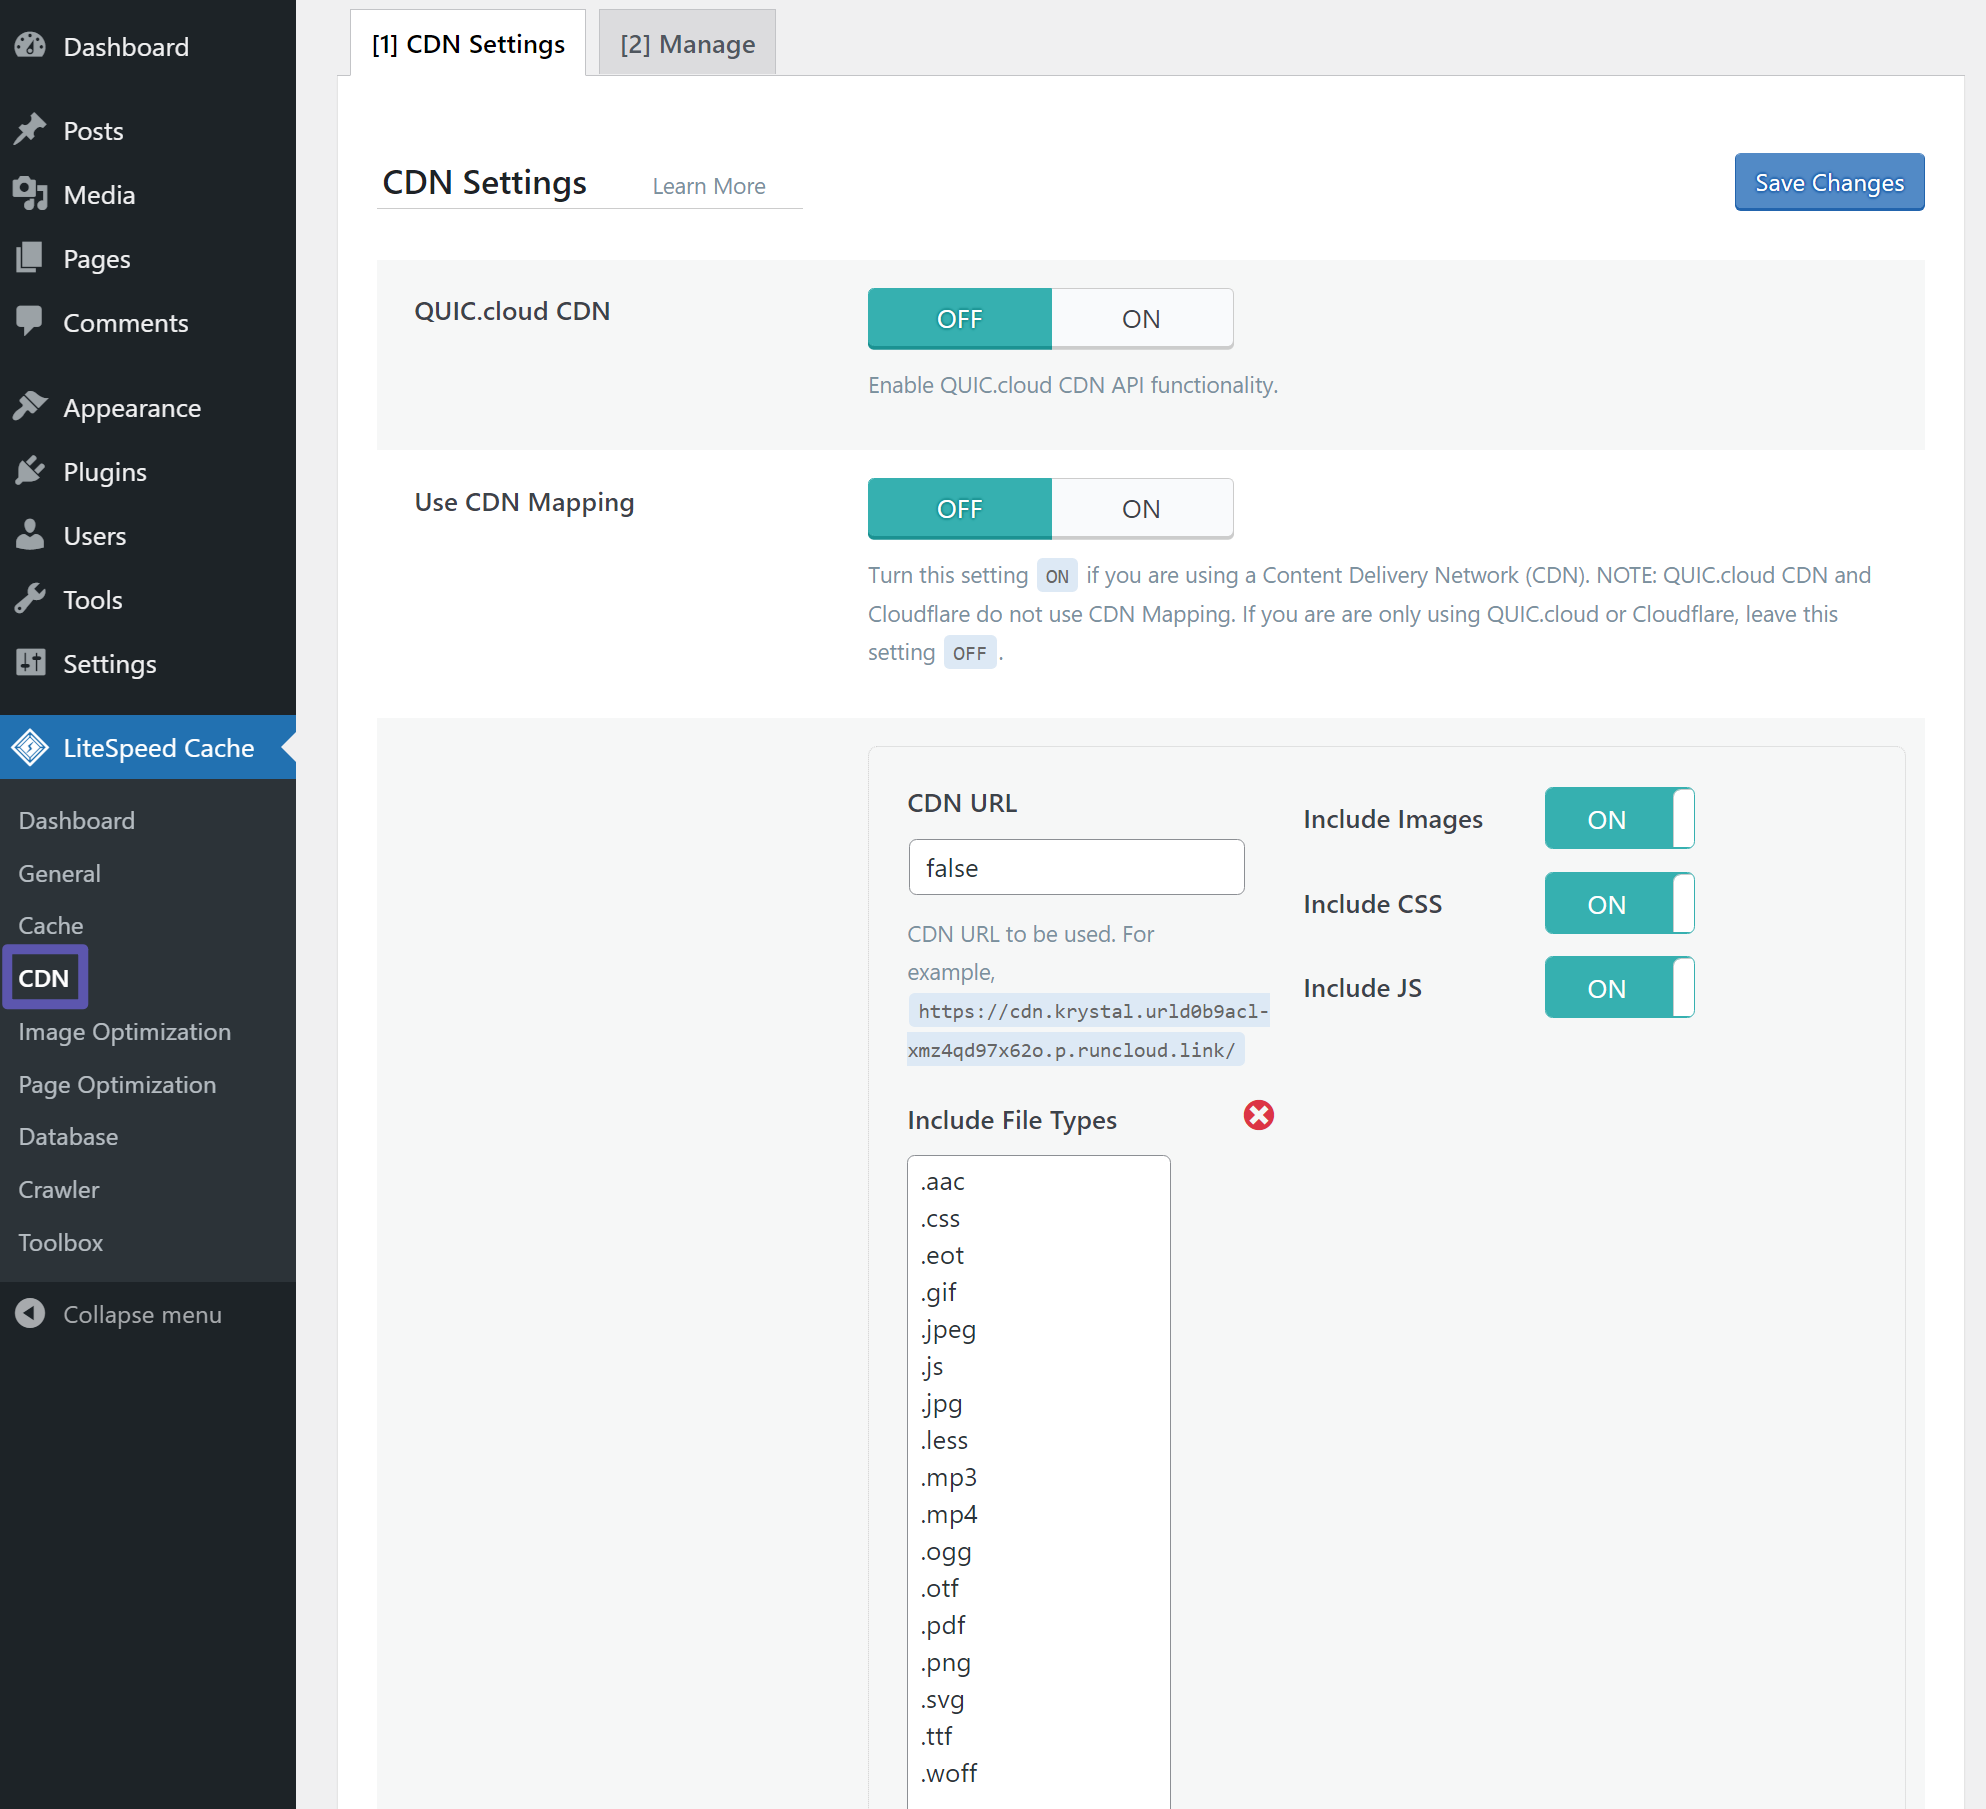
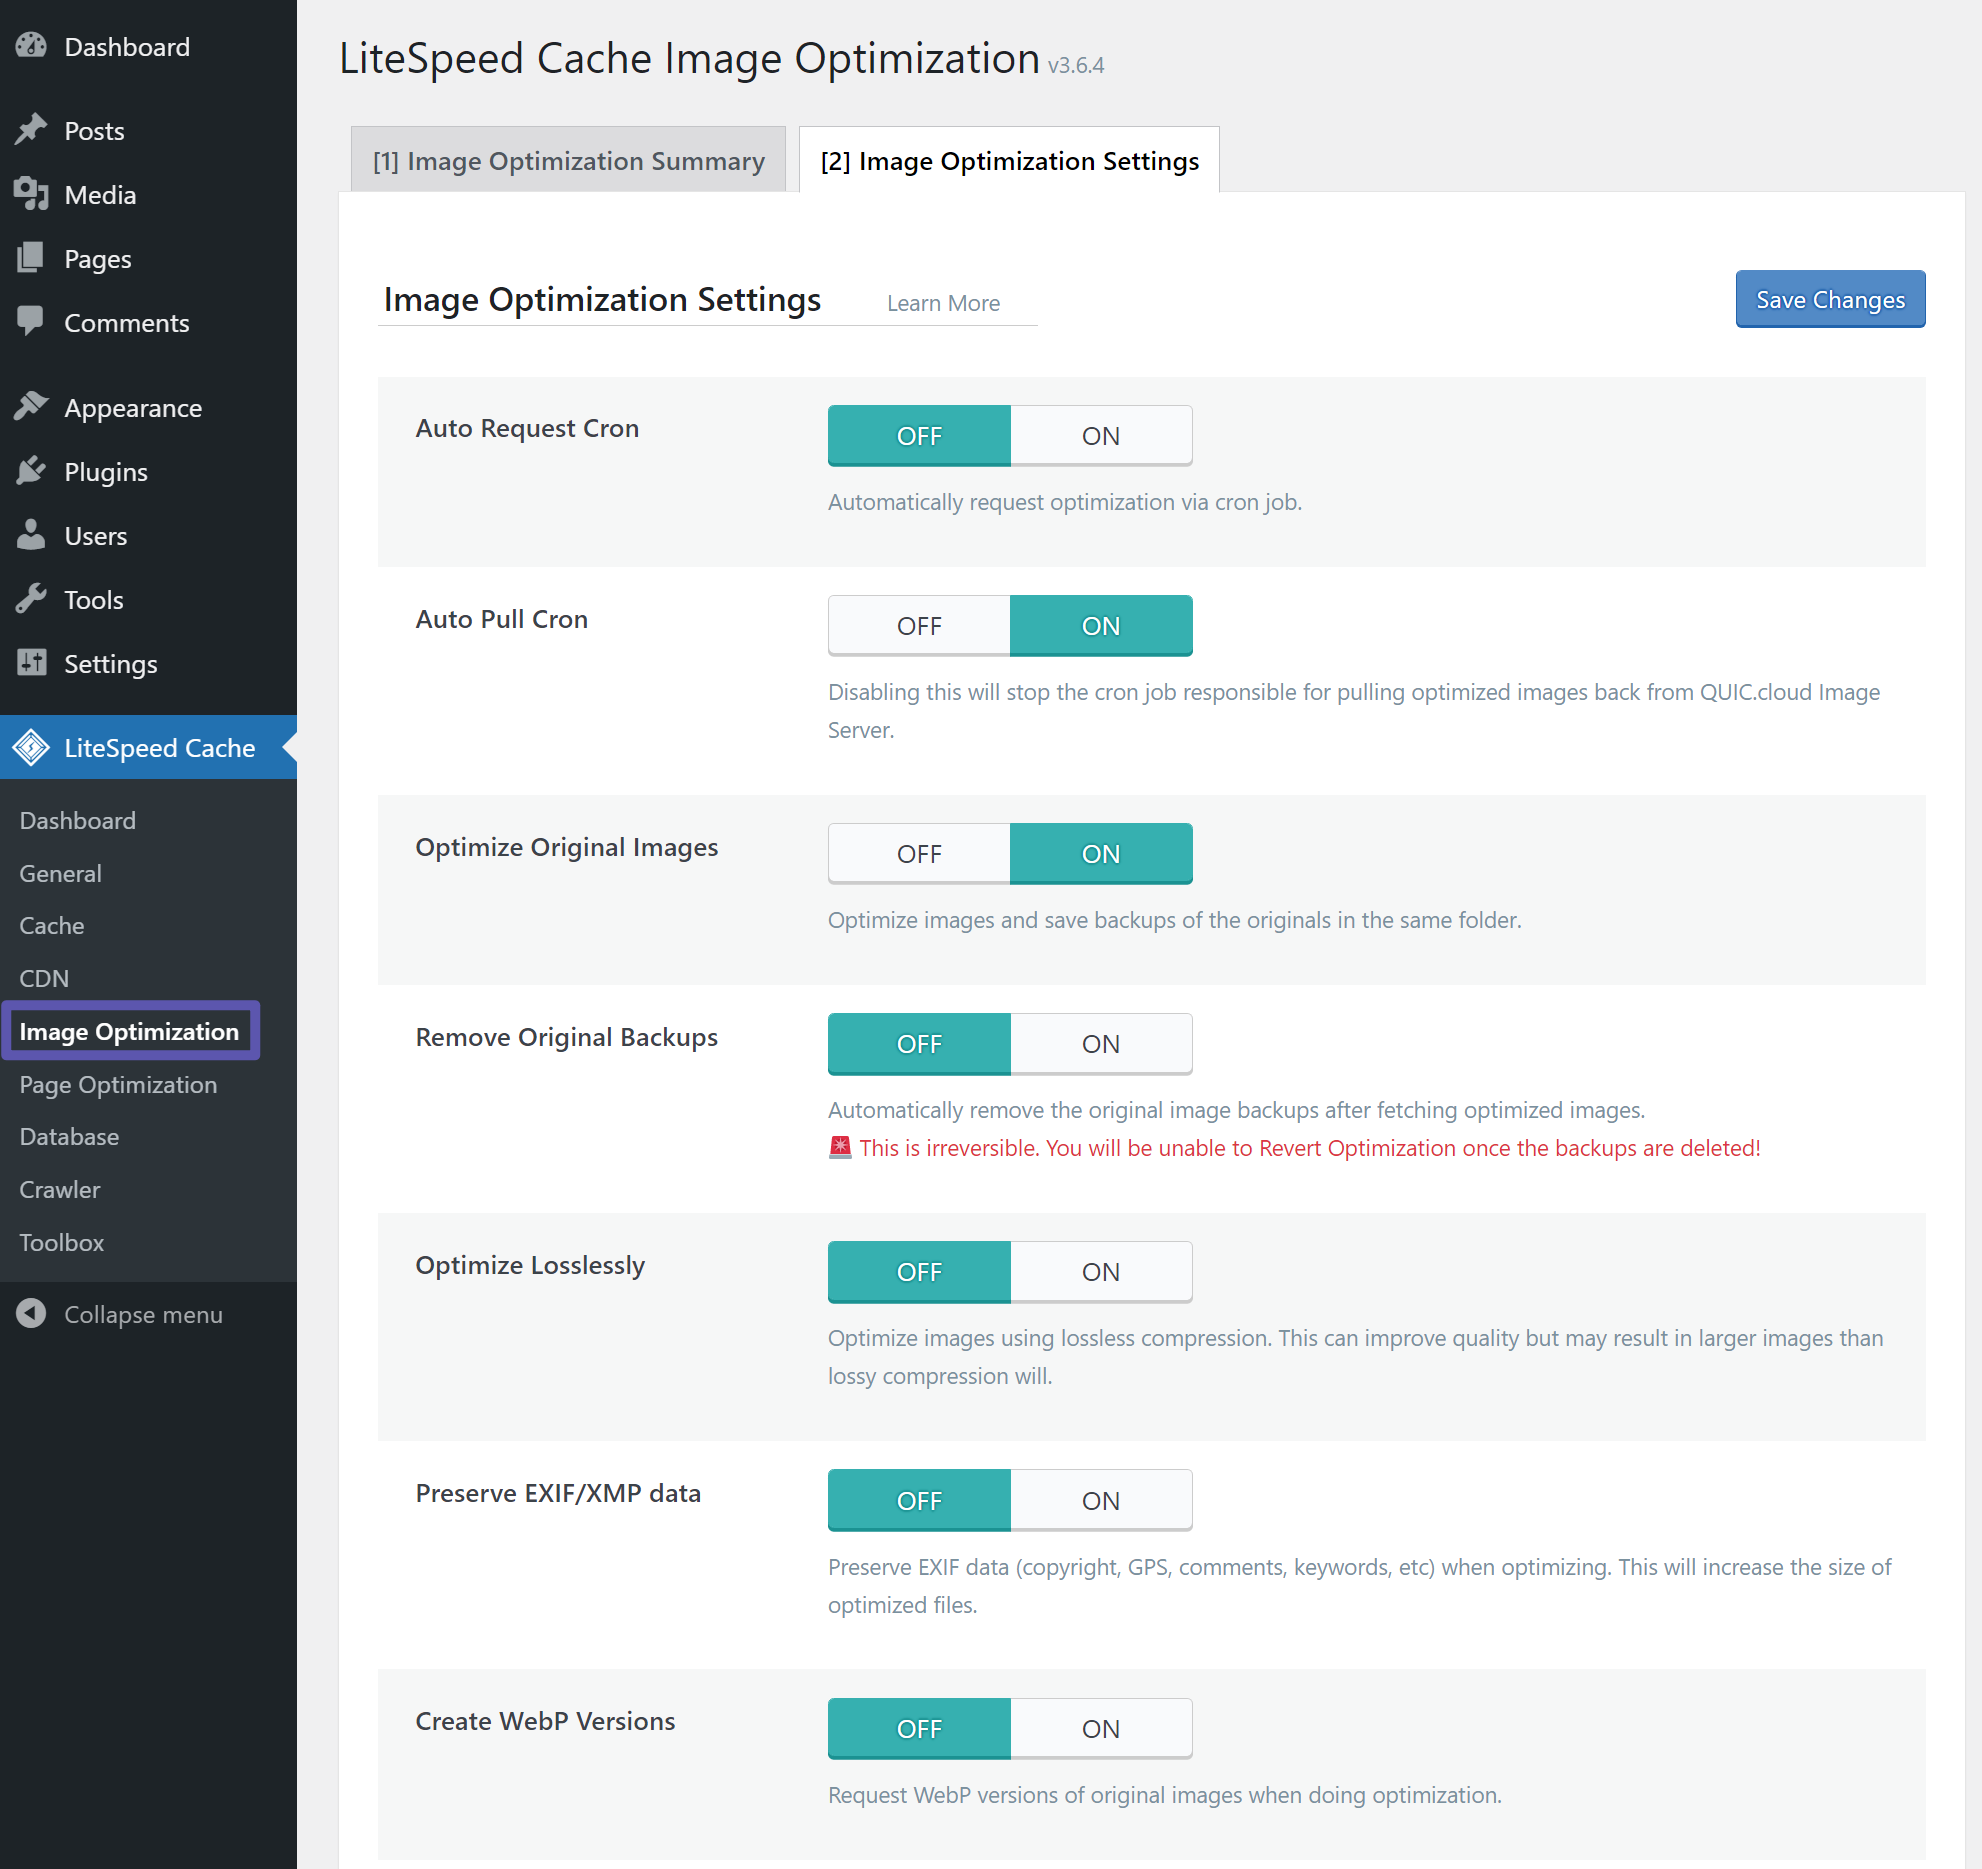
Image Optimization Tab
LiteSpeed Cache includes its own image optimization features for compression, resizing, and WebP conversion, which can eliminate the need to use a separate image optimization plugin.
To learn how this tab works, you can check out our full guide to using image optimization in LiteSpeed Cache.
Page Optimization
The Page Optimization tab includes a lot of features for optimizing your site's front-end code. Most of these settings are focused on optimizing your site's CSS and JavaScript, but there are also settings to implement lazy loading and other tactics.
Before we jump into this section, it's important to note that these settings can cause front-end display issues on some sites. For example, you might enable a certain CSS optimization feature and then suddenly your site's design looks weird.
These issues can be scary, but they're not permanent. If you see any issues after enabling these features, you just need to disable the feature and your site will go back to normal right away.
Basically - don't panic if something looks off - your site will be just fine!
With that introduction out of the way, let's get into how to configure the LiteSpeed Cache page optimization settings.
CSS Settings
The CSS Settings tab includes a range of options to optimize your site's CSS code. You have some flexibility for how you configure this, so we recommend playing around with how it works.
At a bare minimum, you'll want to enable CSS Minify. Some experts also recommend CSS Combine, but this can cause issues and often doesn't lead to any benefit (especially on servers using HTTP/2), so you can feel free to leave it off.
The other big decision here is whether you want to generate critical CSS (which requires a connection with the QUIC.cloud critical CSS service - you can set this up in the main General tab).
Critical CSS will make the page size slightly bigger, but it can lead to faster perceived load times. You can play around with it to see how it affects your site's performance.
However, the automatic critical CSS feature doesn't always work perfectly, so you might just want to leave it off if you don't want to tinker.
If you do use critical CSS, you can then enable the option to Load CSS Asynchronously (don't enable this if you aren't using critical CSS, though).
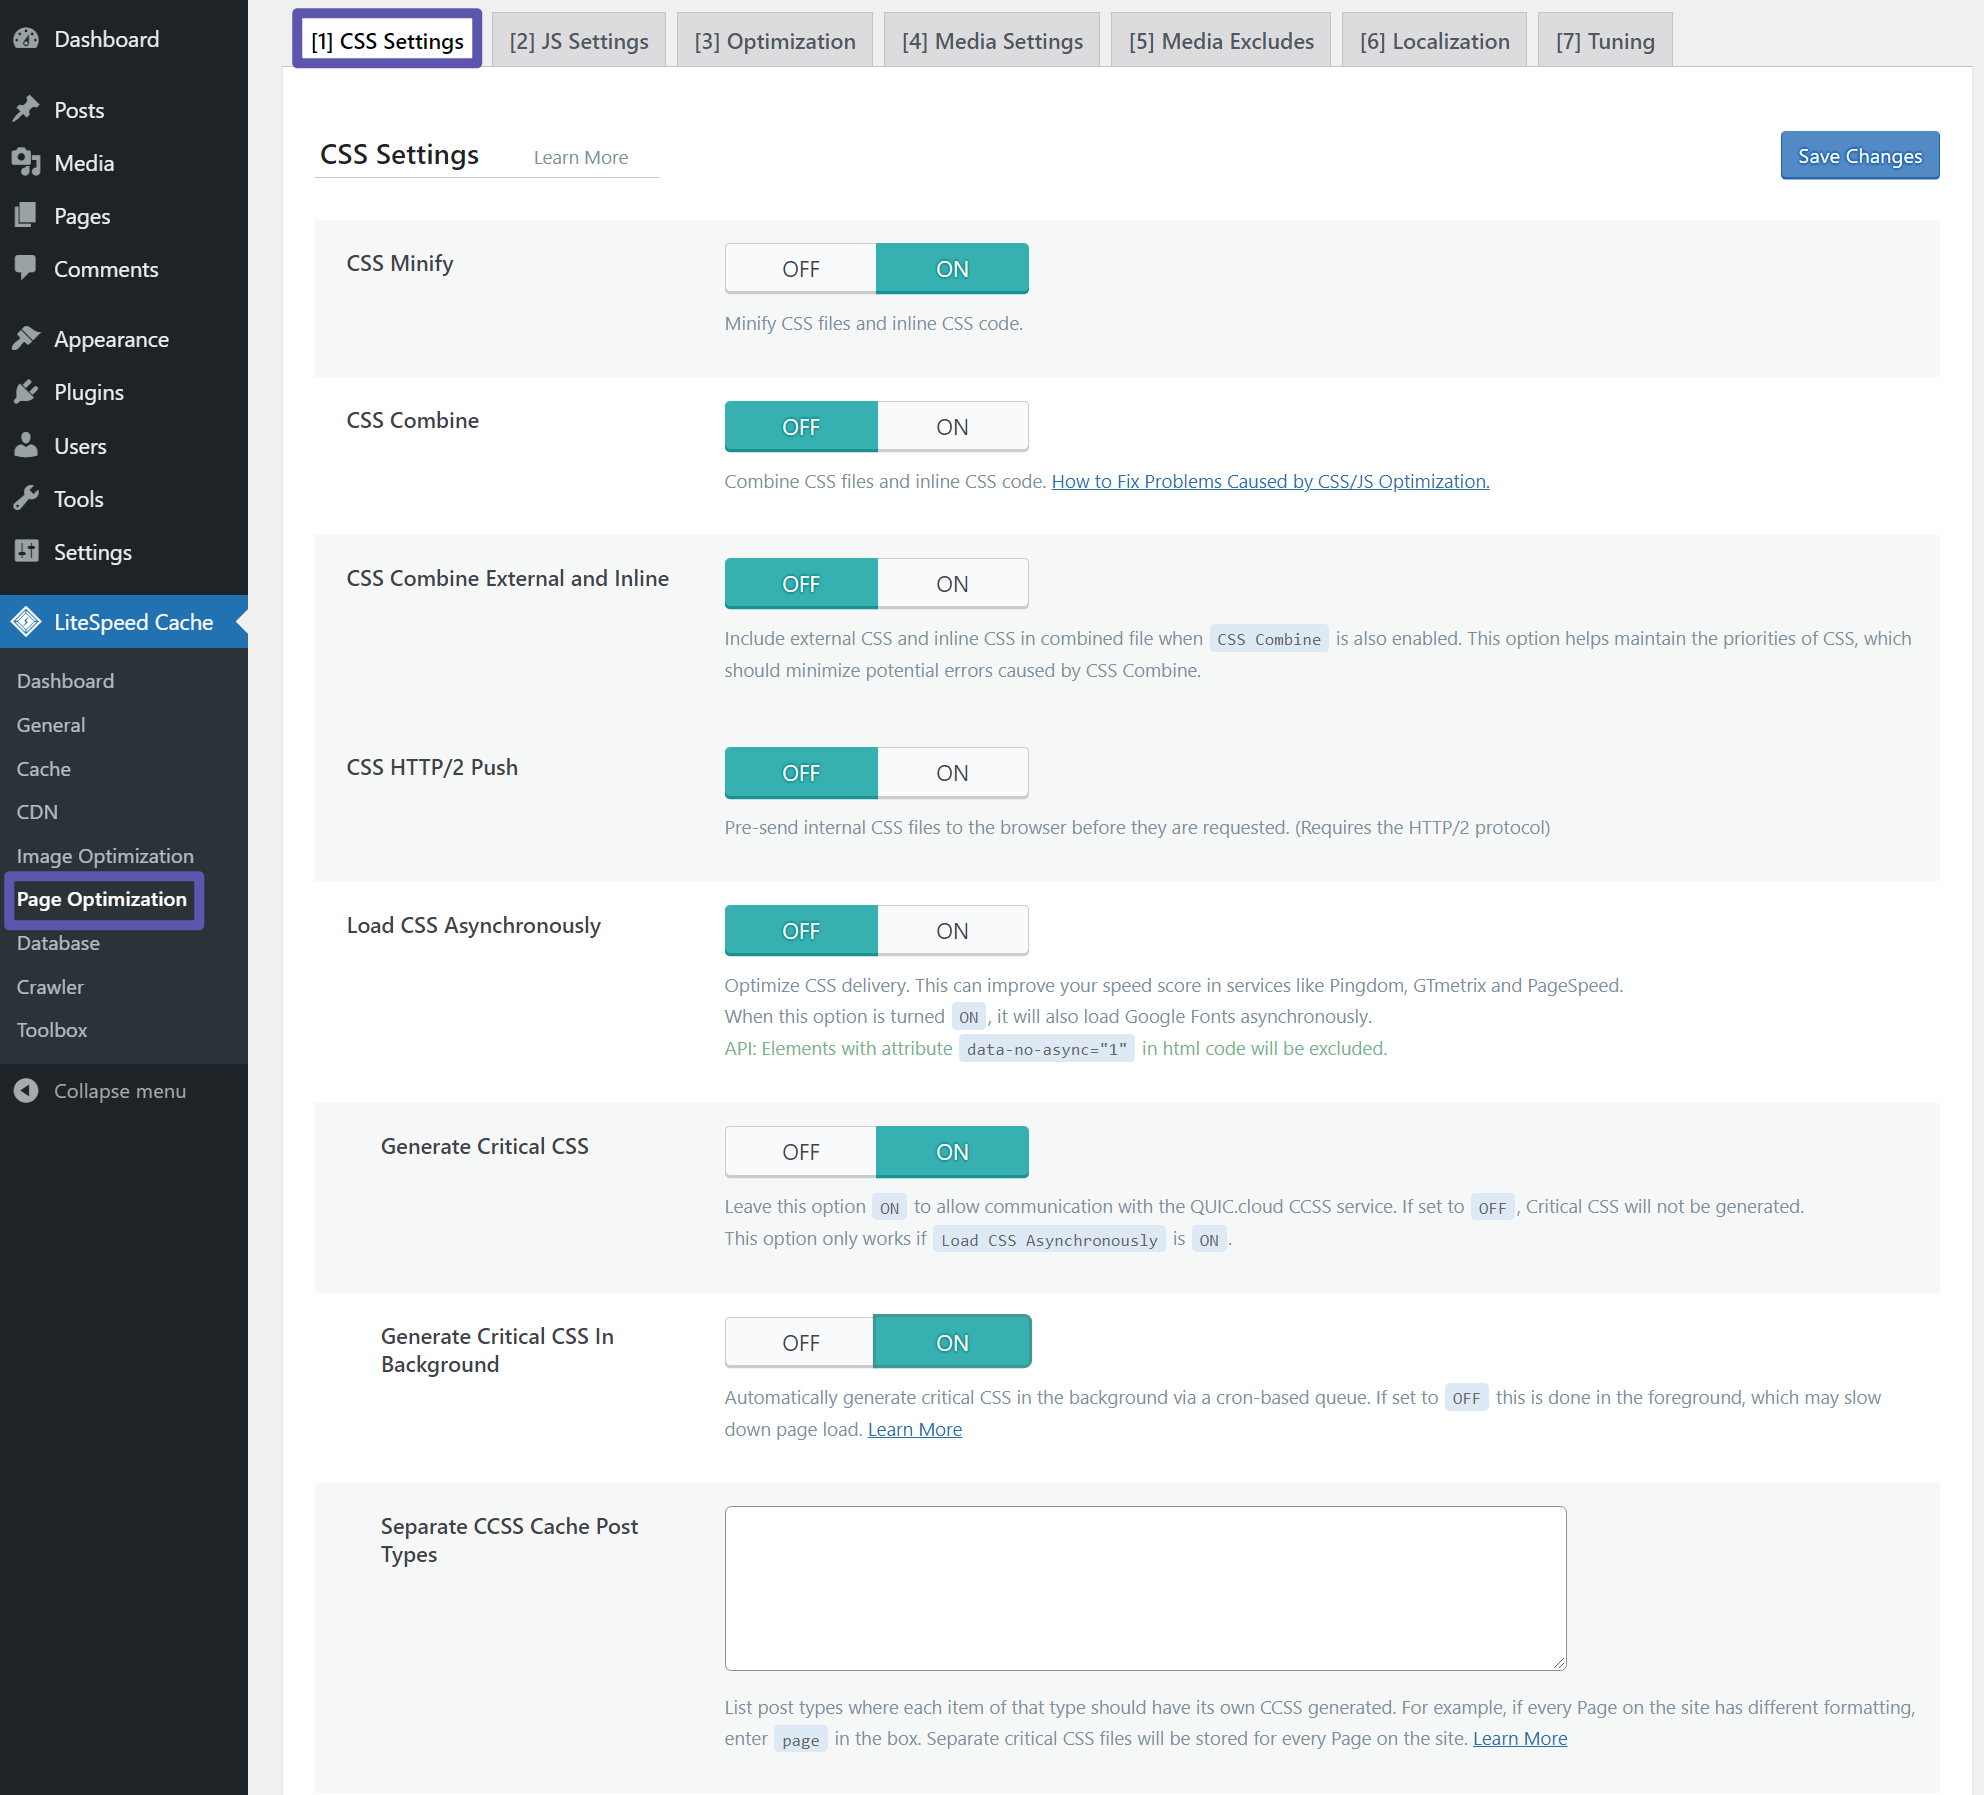
Overall - if you don't feel like tinkering, just enable CSS Minify and call it a day.
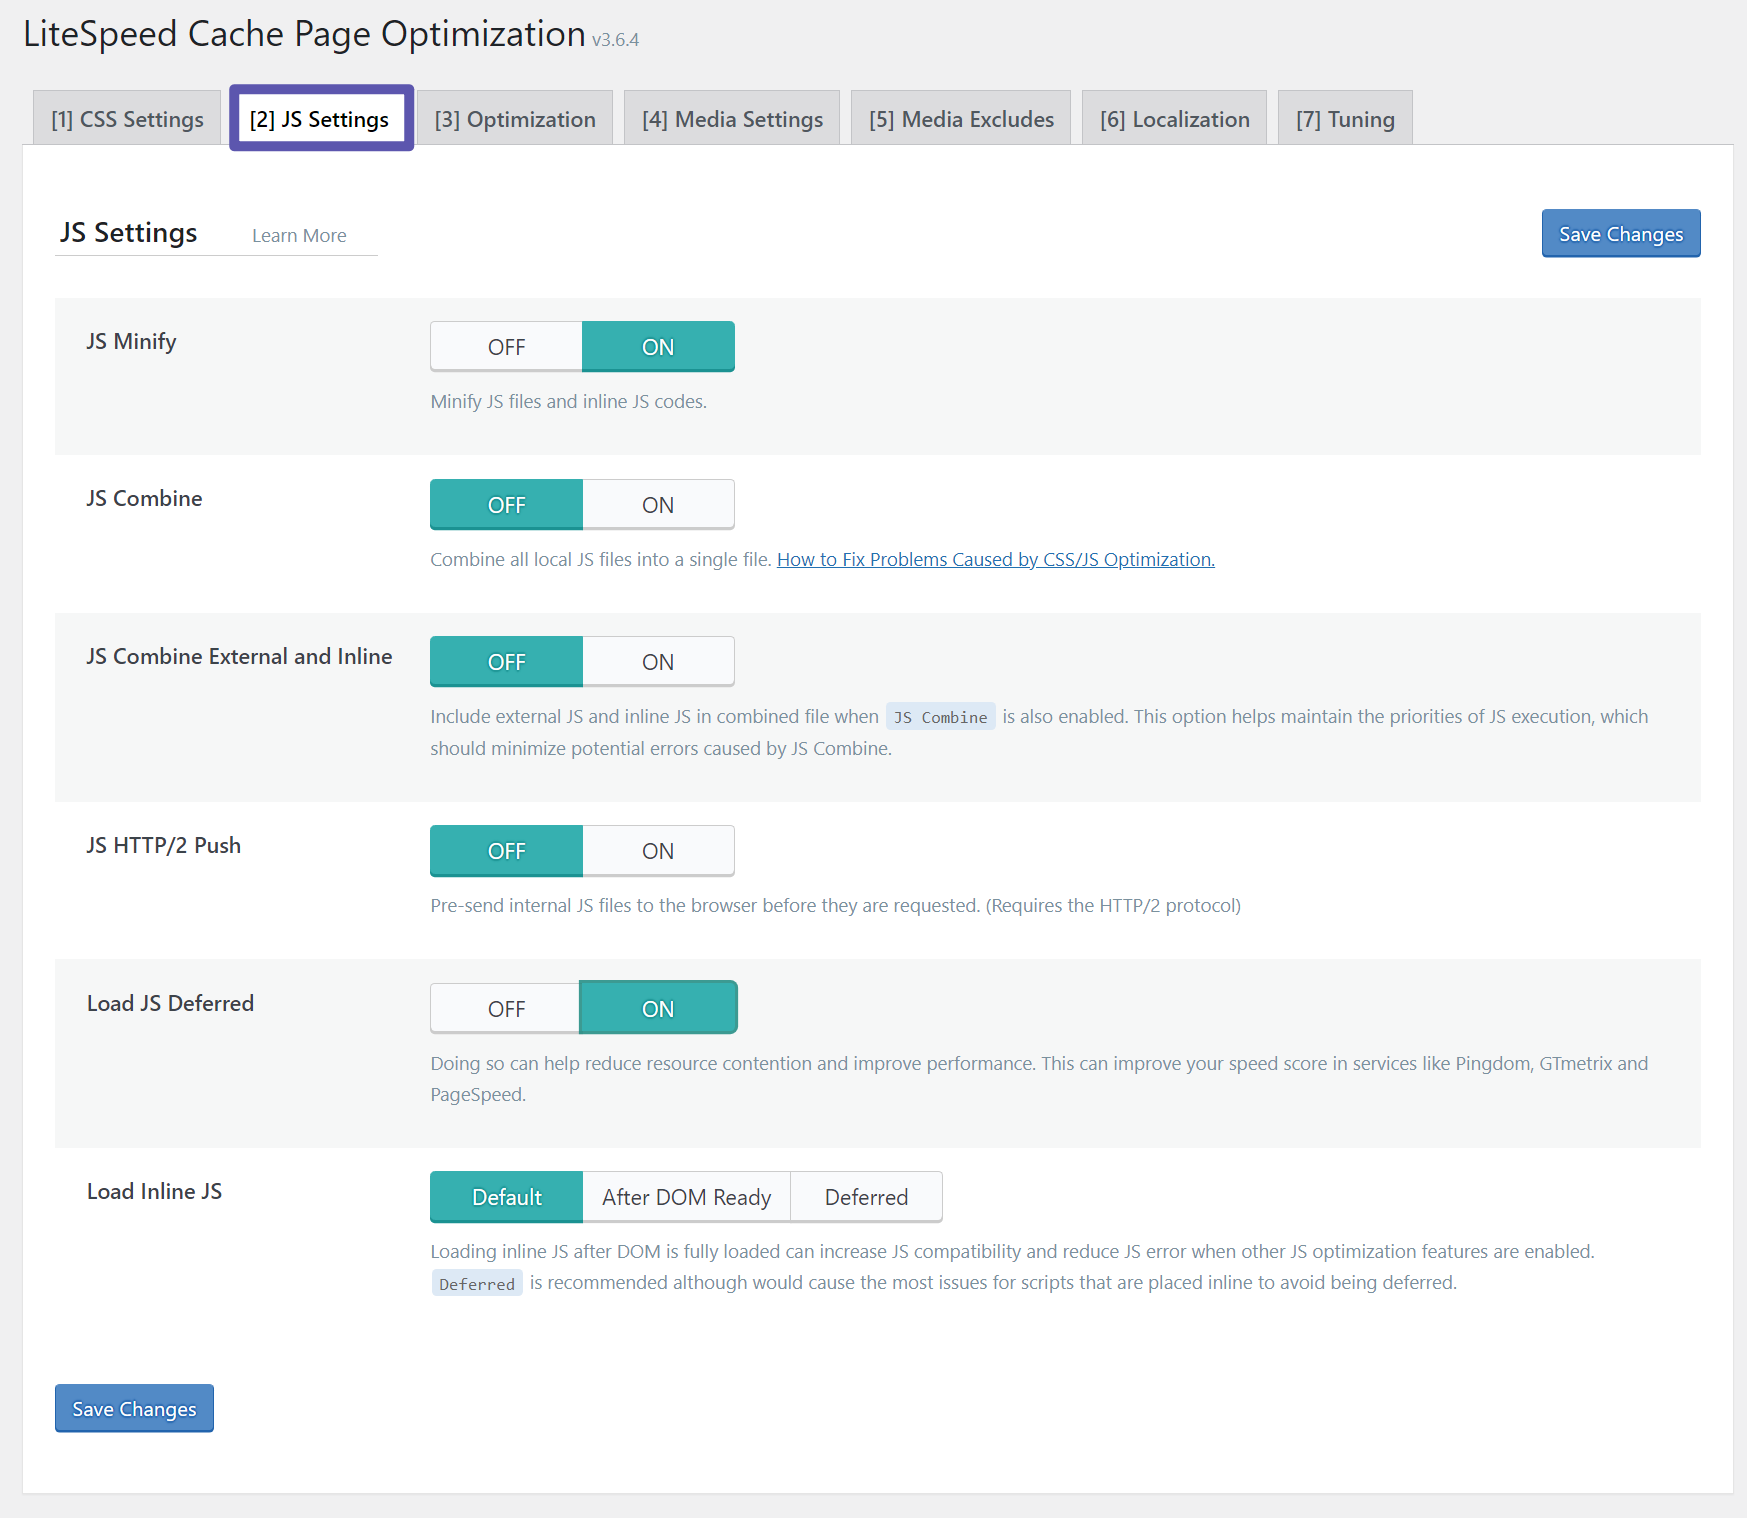
JS Settings
The JS Settings tab follows the same idea as the CSS settings tab, just for your site's JavaScript.
As with CSS, you'll probably want to enable JS Minify, but the rest of the features are optional.
If you want to improve your scores in tools like PageSpeed Insights, you can enable the option to Load JS Deferred to delay loading JavaScript files.
However, this can sometimes cause issues if those files are required for your site to load - so make sure you test your site.
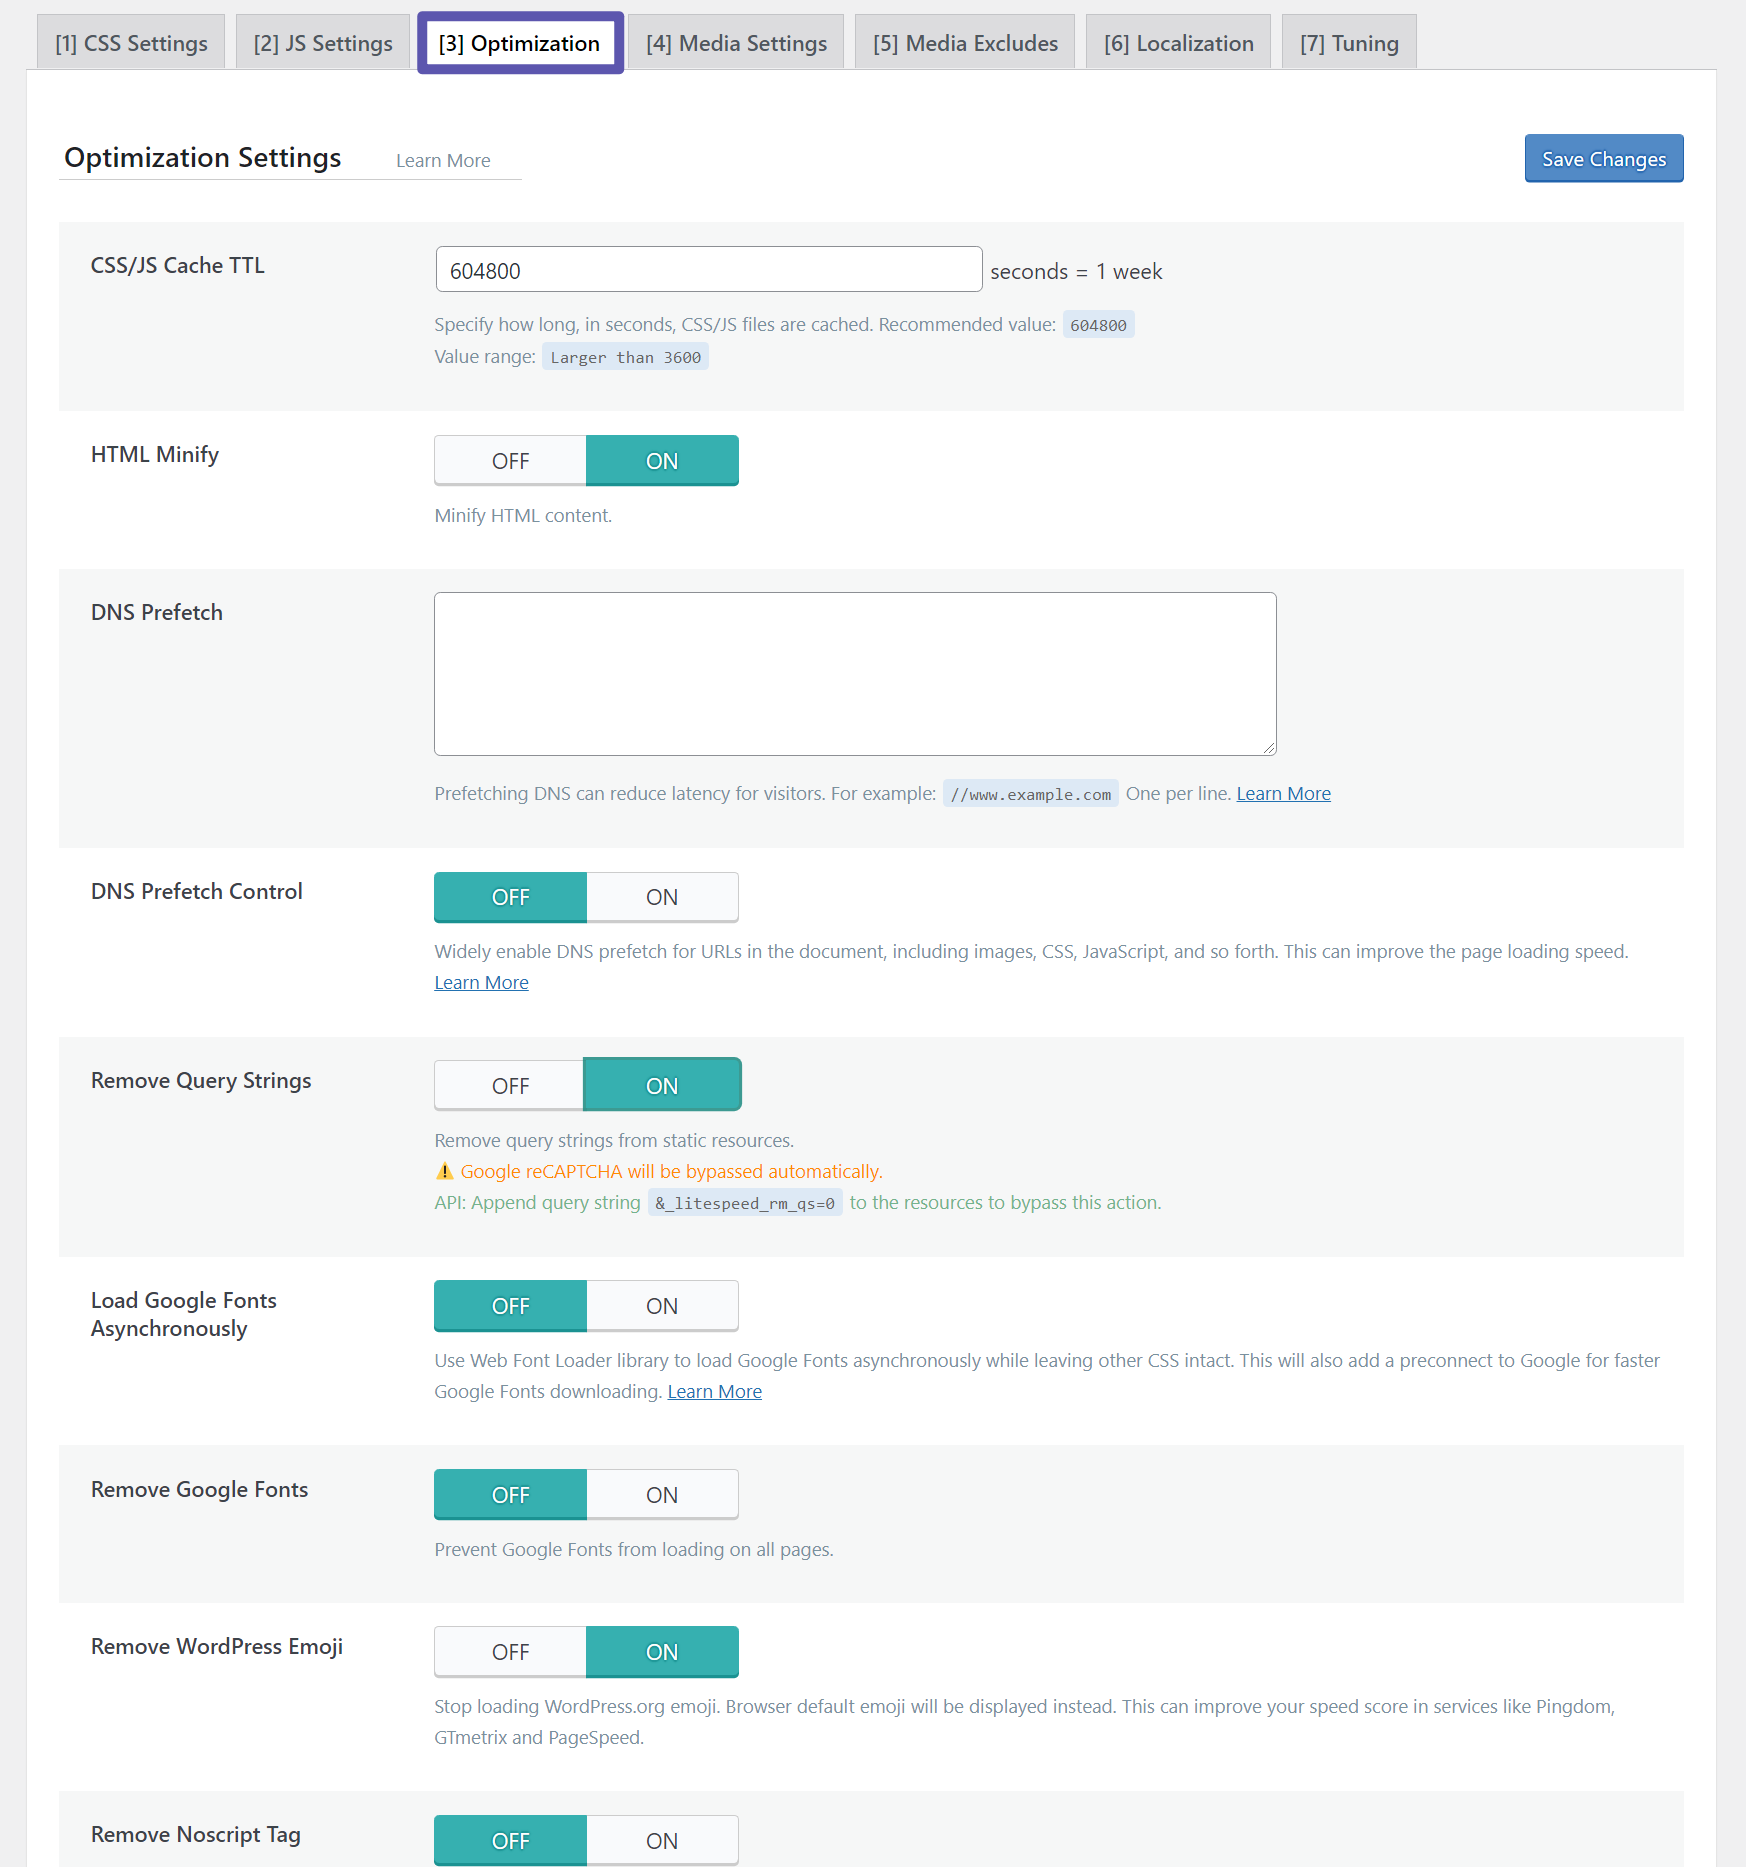
Optimization
The Optimization tab holds some catch-all settings for optimizing various parts of your site.
Here, you might want to enable the following:
- HTML Minify
- Remove Query Strings - can improve page speed scores, but it's not essential so you can go either way here.
- Remove WordPress emoji - removes an unnecessary HTTP request because all browsers can natively load emojis nowadays.
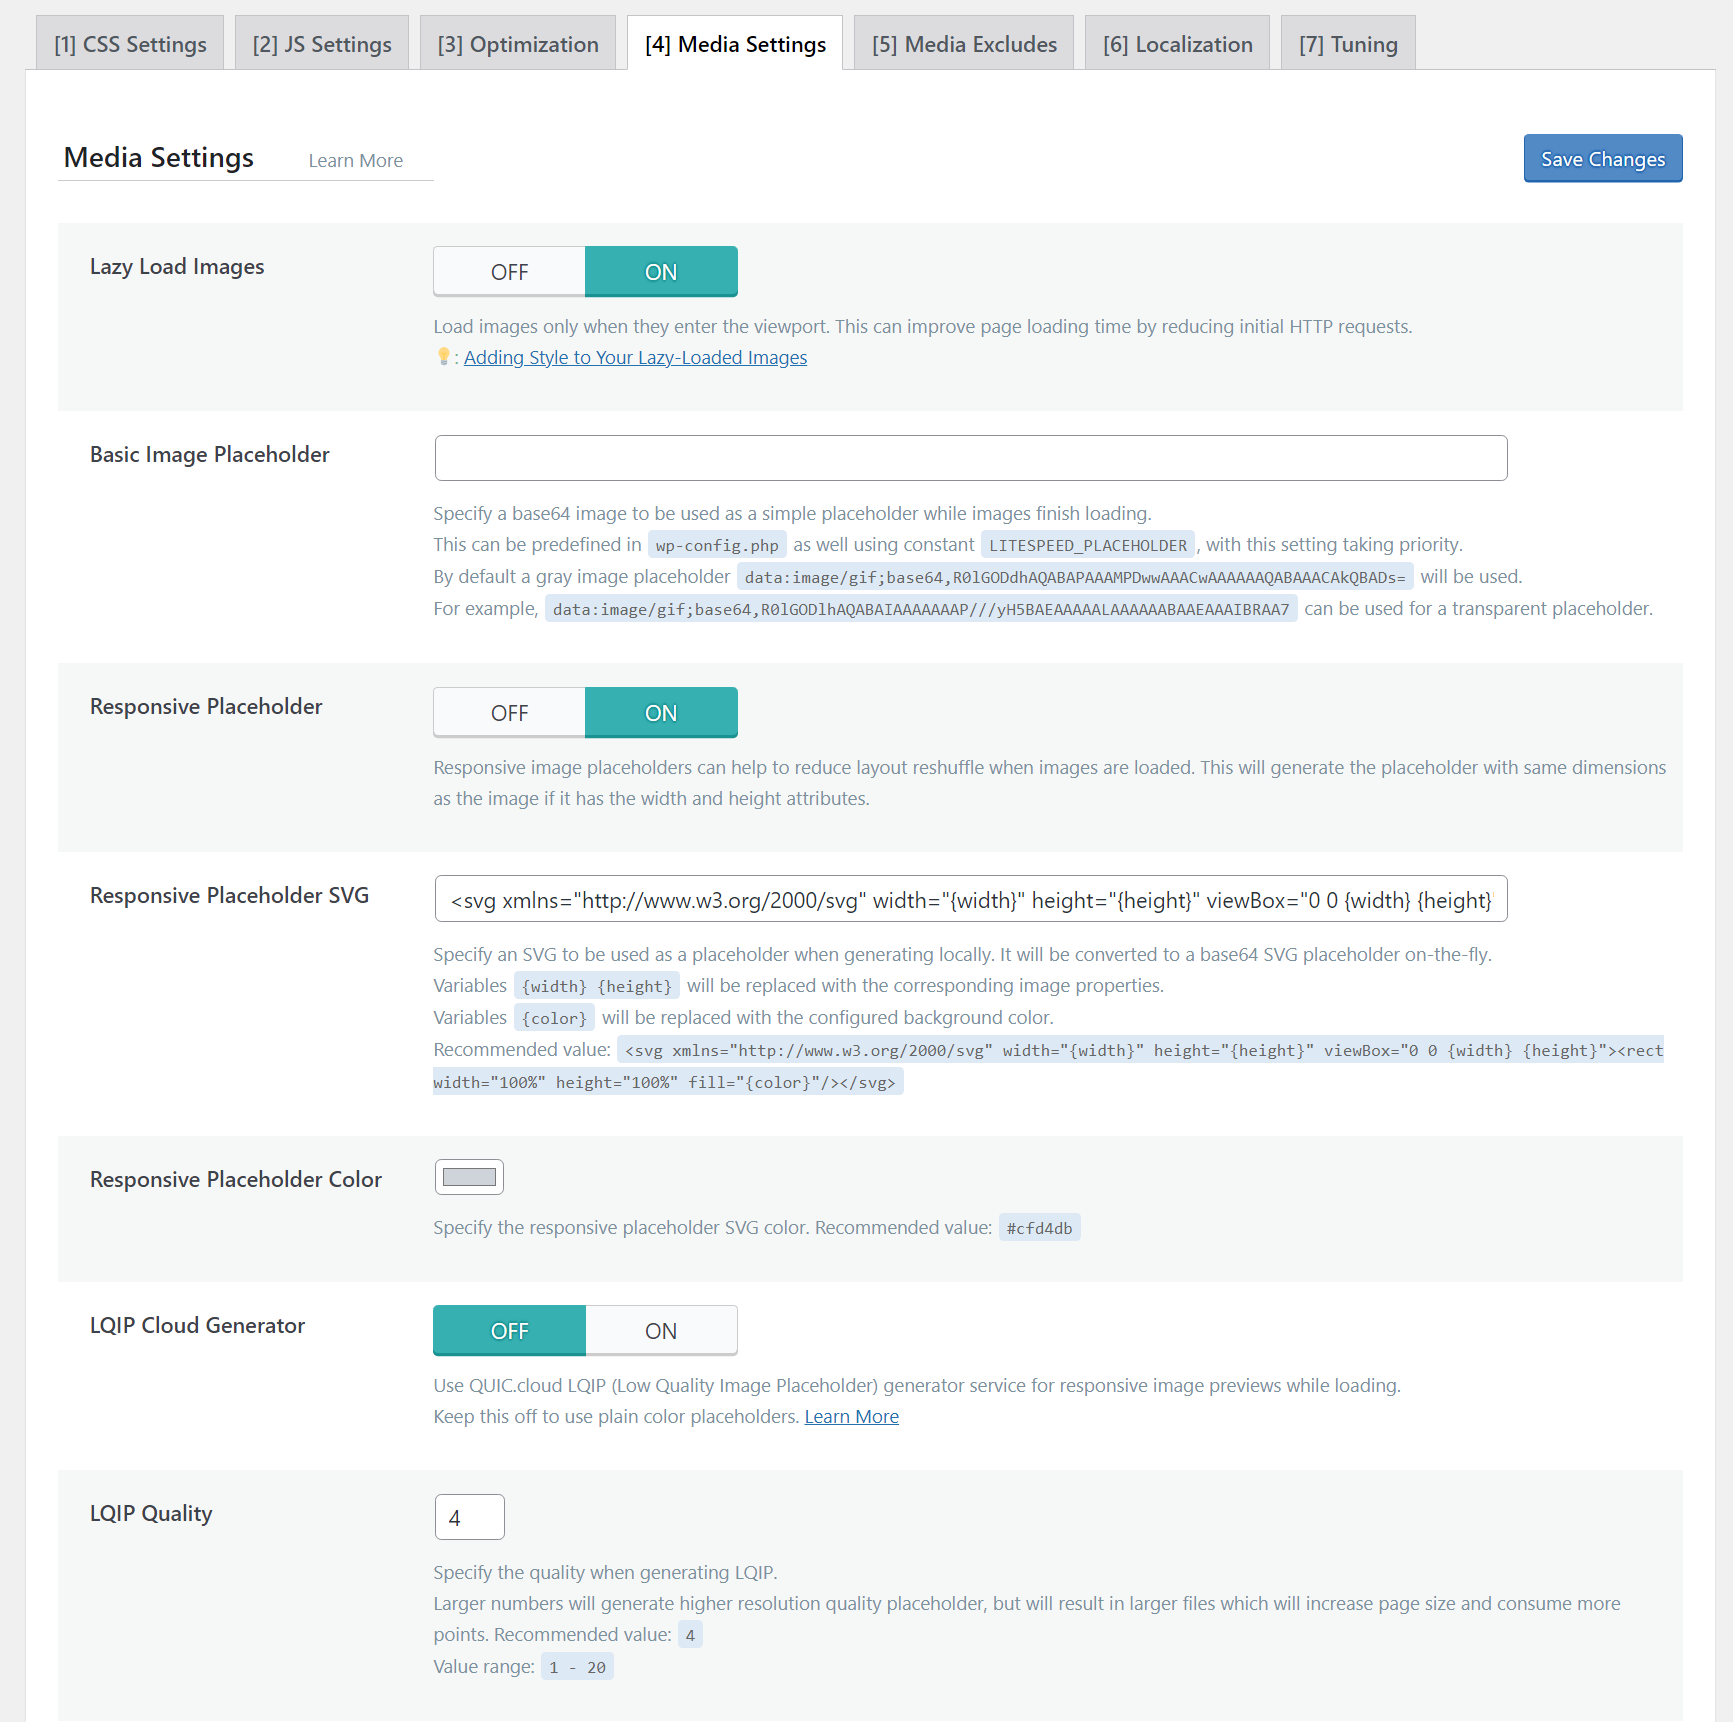
Media Settings
The Media Settings tab lets you set up lazy loading for images and iframes. This lets you delay loading below-the-fold content to speed up initial load times.
As of WordPress 5.5 and 5.7, WordPress supports native browser lazy loading for images and iframes, so your site will benefit from lazy loading already in supported browsers. However, Safari doesn't currently support native lazy loading, so enabling the Lazy Load Images and Lazy Load iFrames options lets you ensure lazy loading for all browsers.
If you do enable lazy loading, you might want to specify a Responsive Placeholder to avoid layout shift.
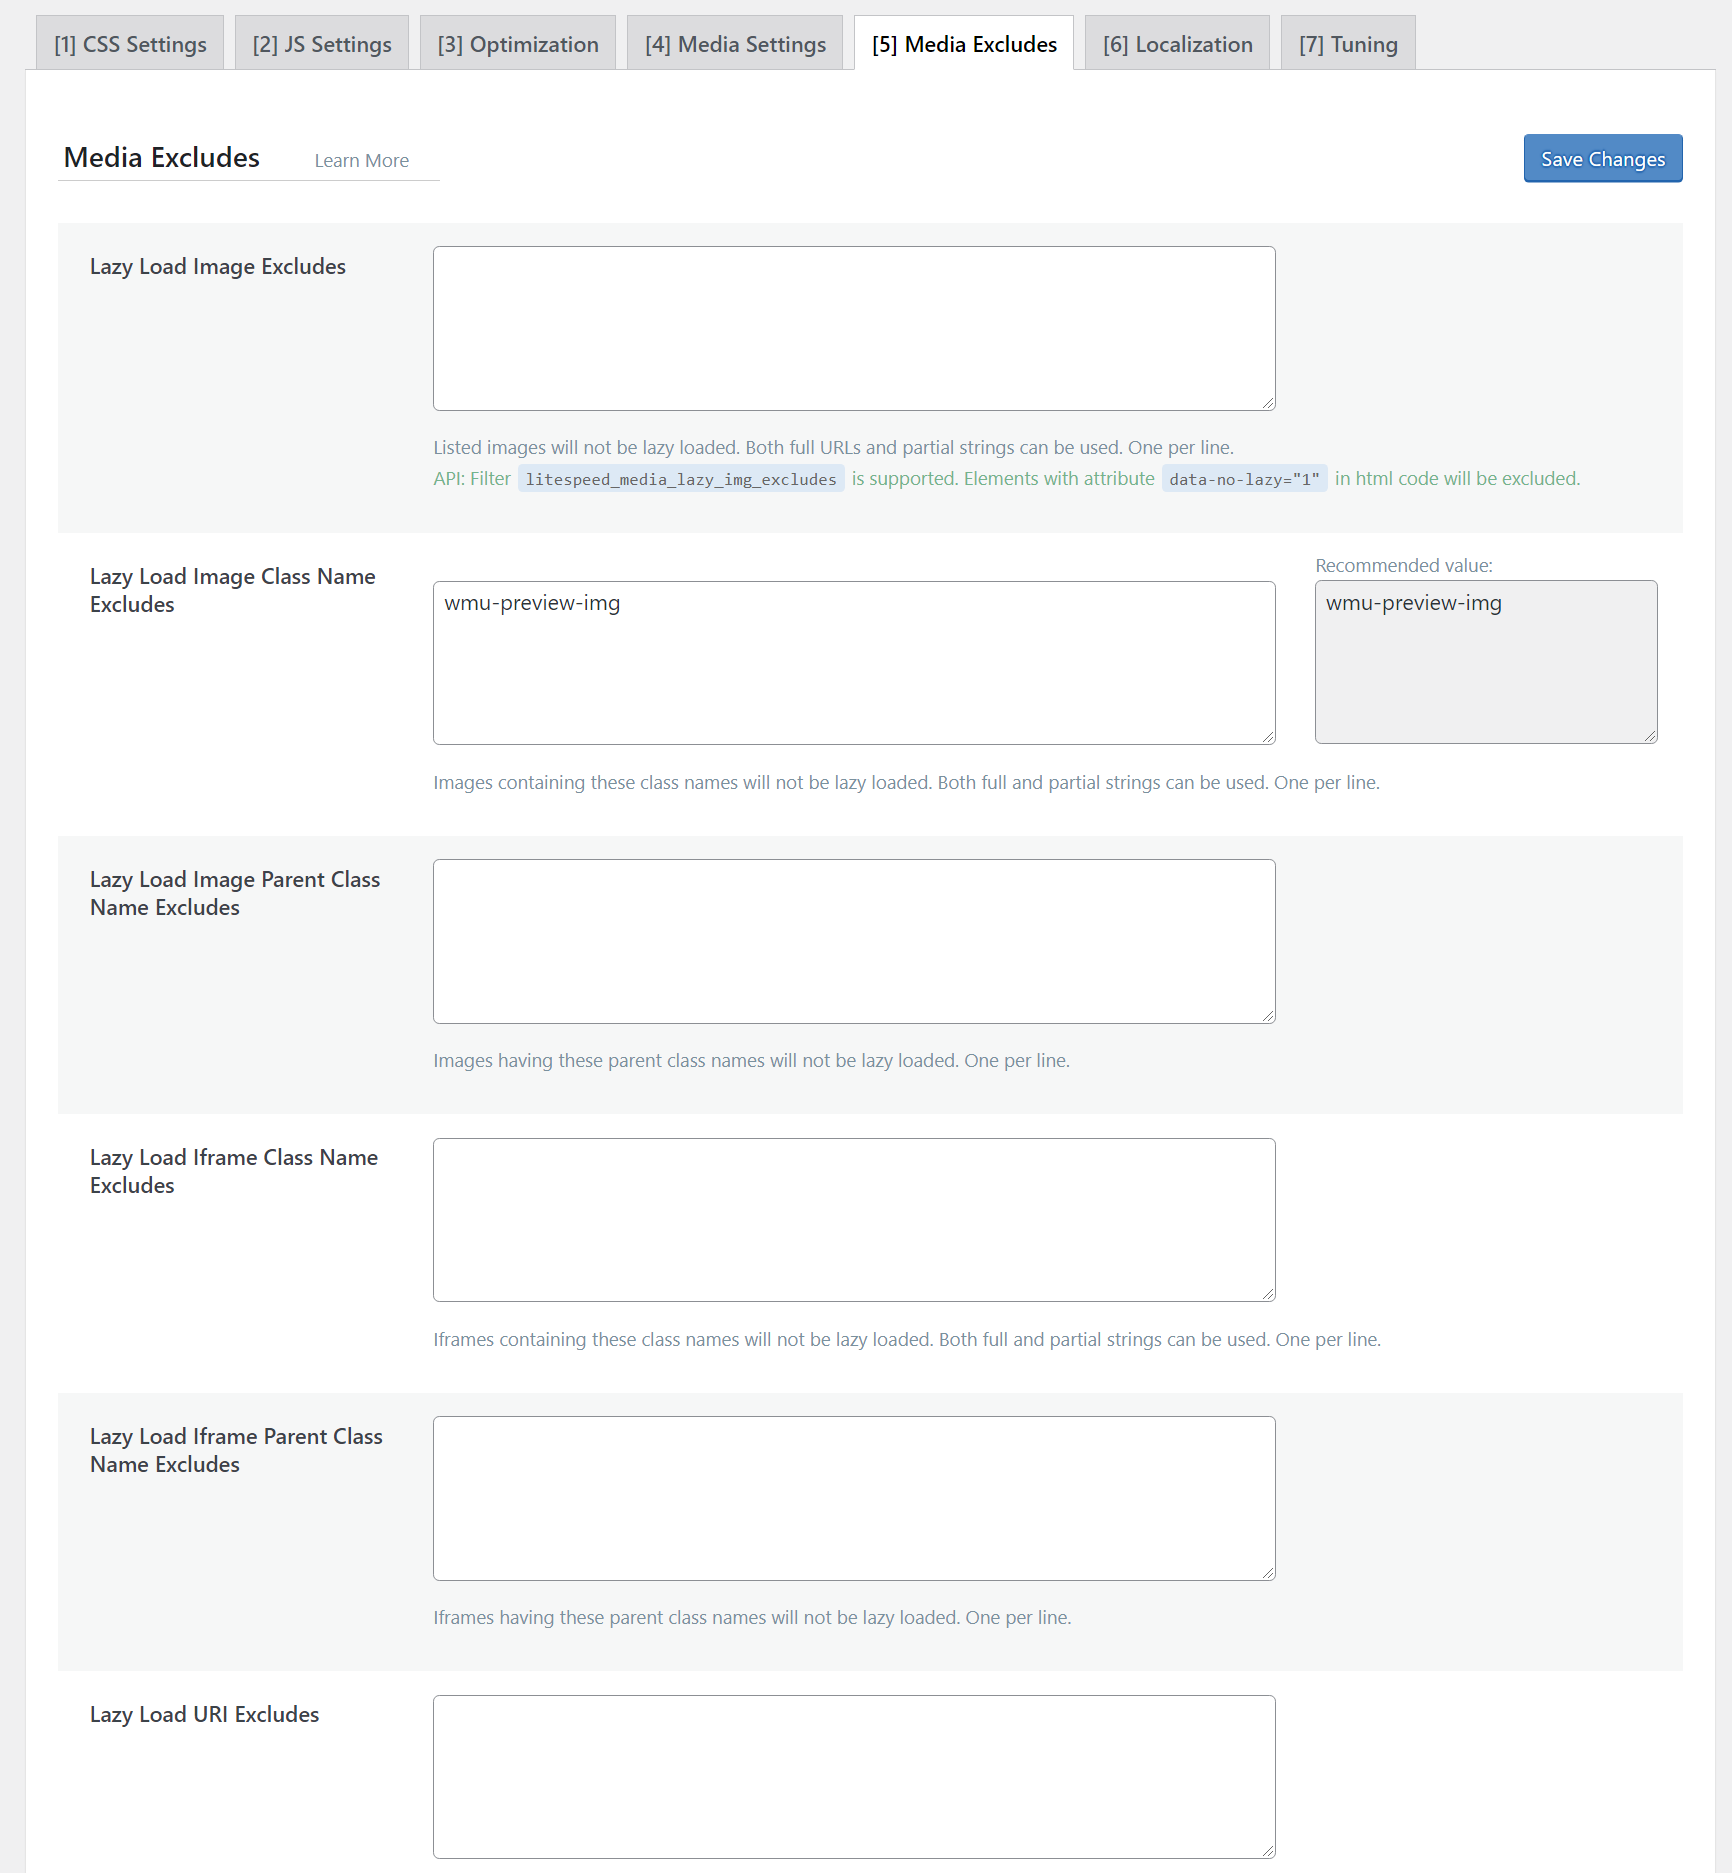
Media Excludes
If you're using lazy loading, the Media Excludes tab lets you manually exclude certain images or iframes from being lazy loaded. This is optional - you only need to set this up if you're having issues with lazy loading a certain file/iframe:
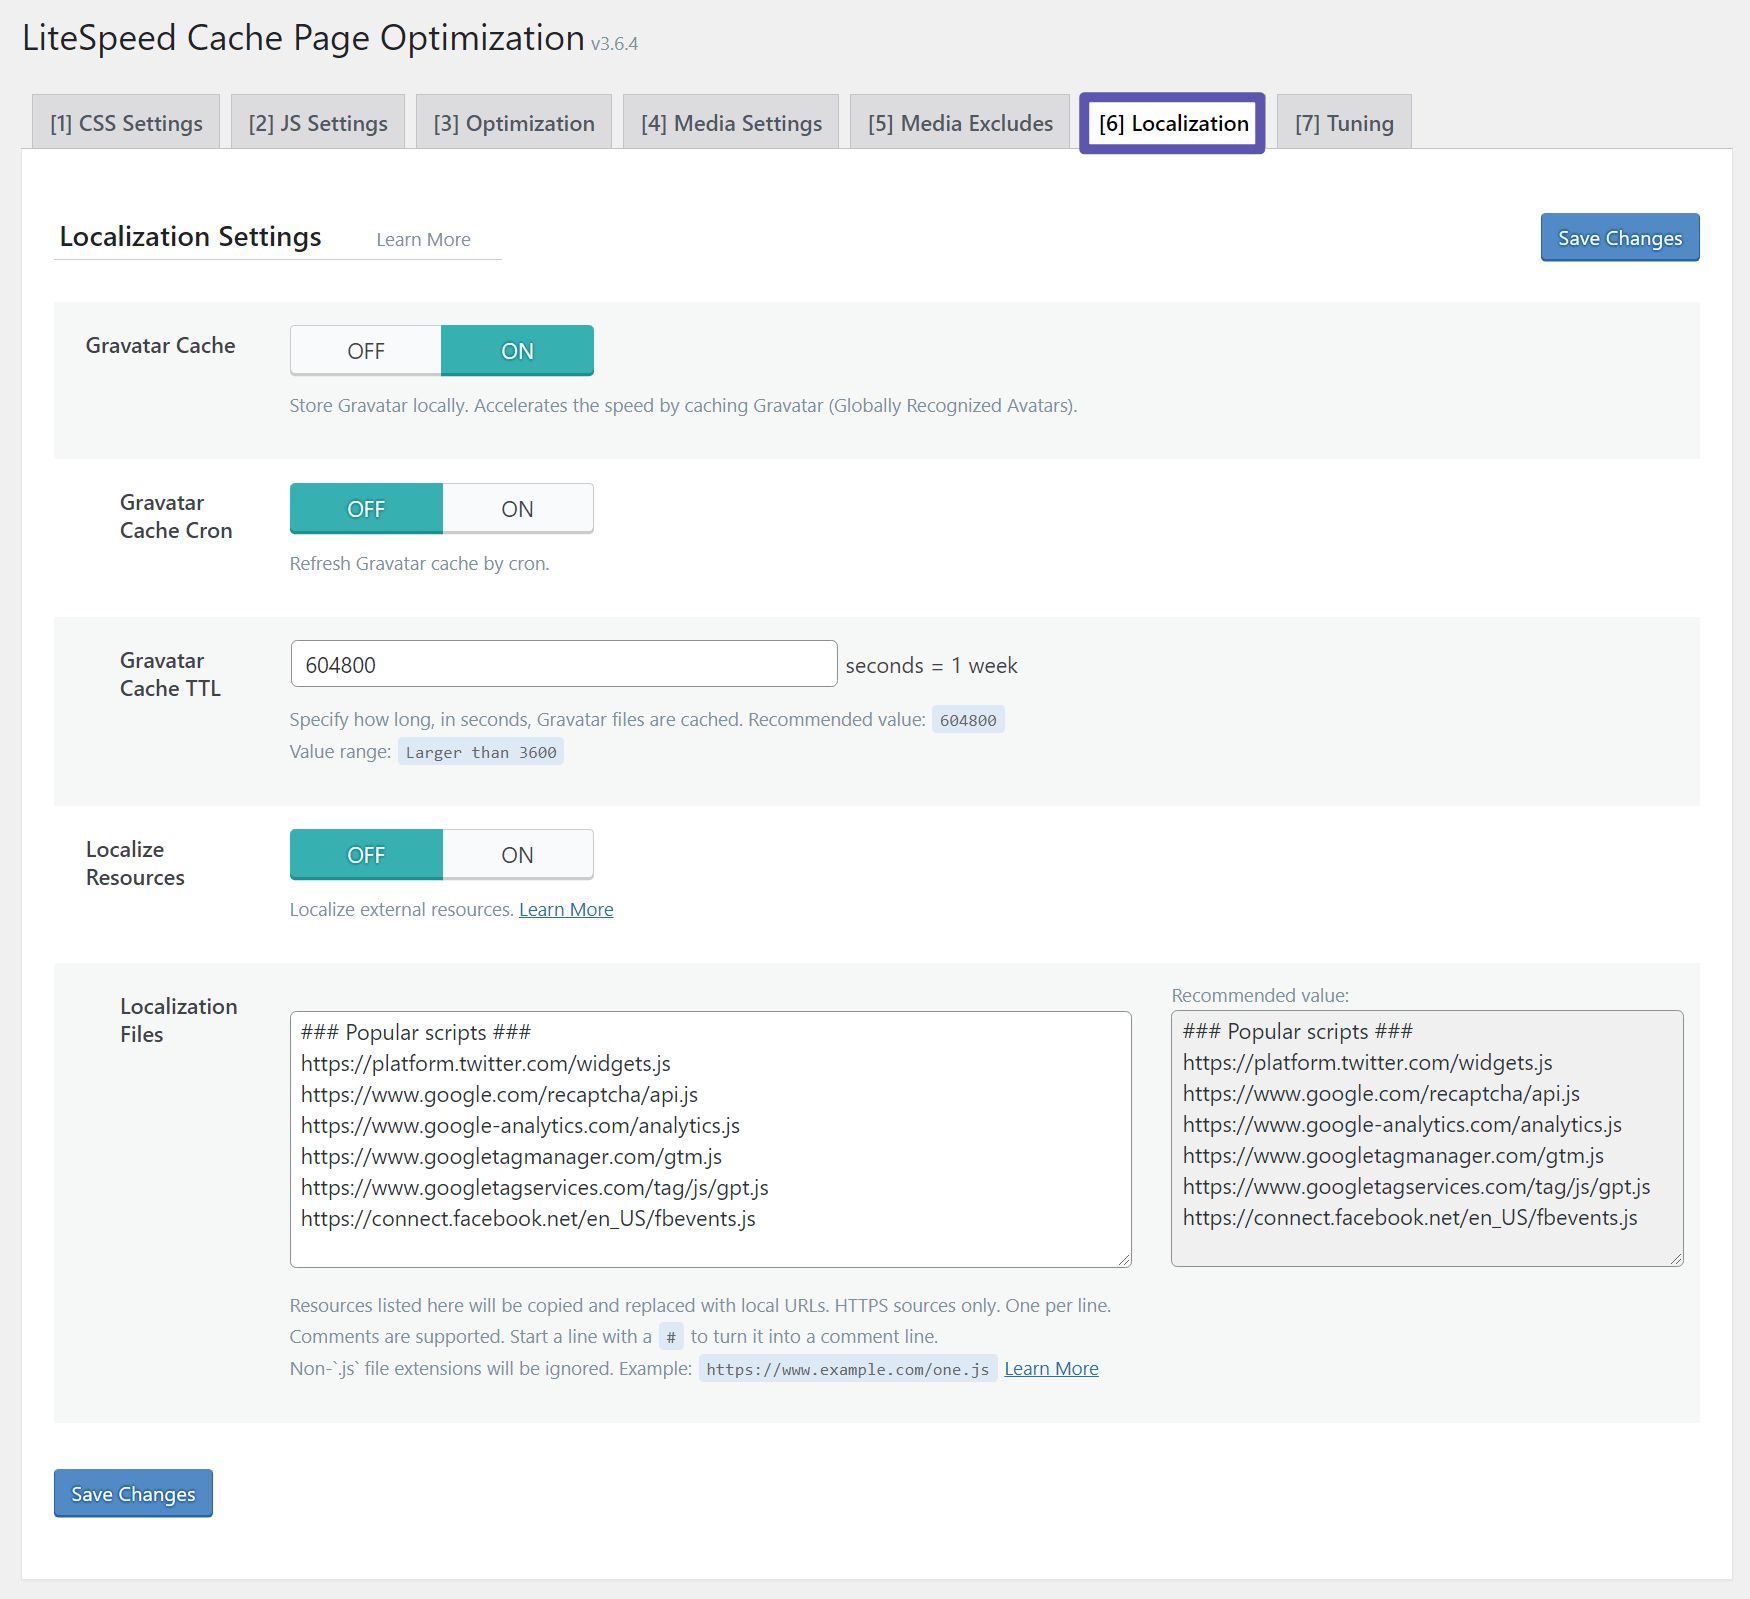
Localization
By default, WordPress uses the Gravatar service to display avatars for people who leave a comment. If your site gets a lot of comments, you can enable the Gravatar Cache here to store those avatar images locally instead of making third-party HTTP requests.
Otherwise, you can just leave these as the defaults.
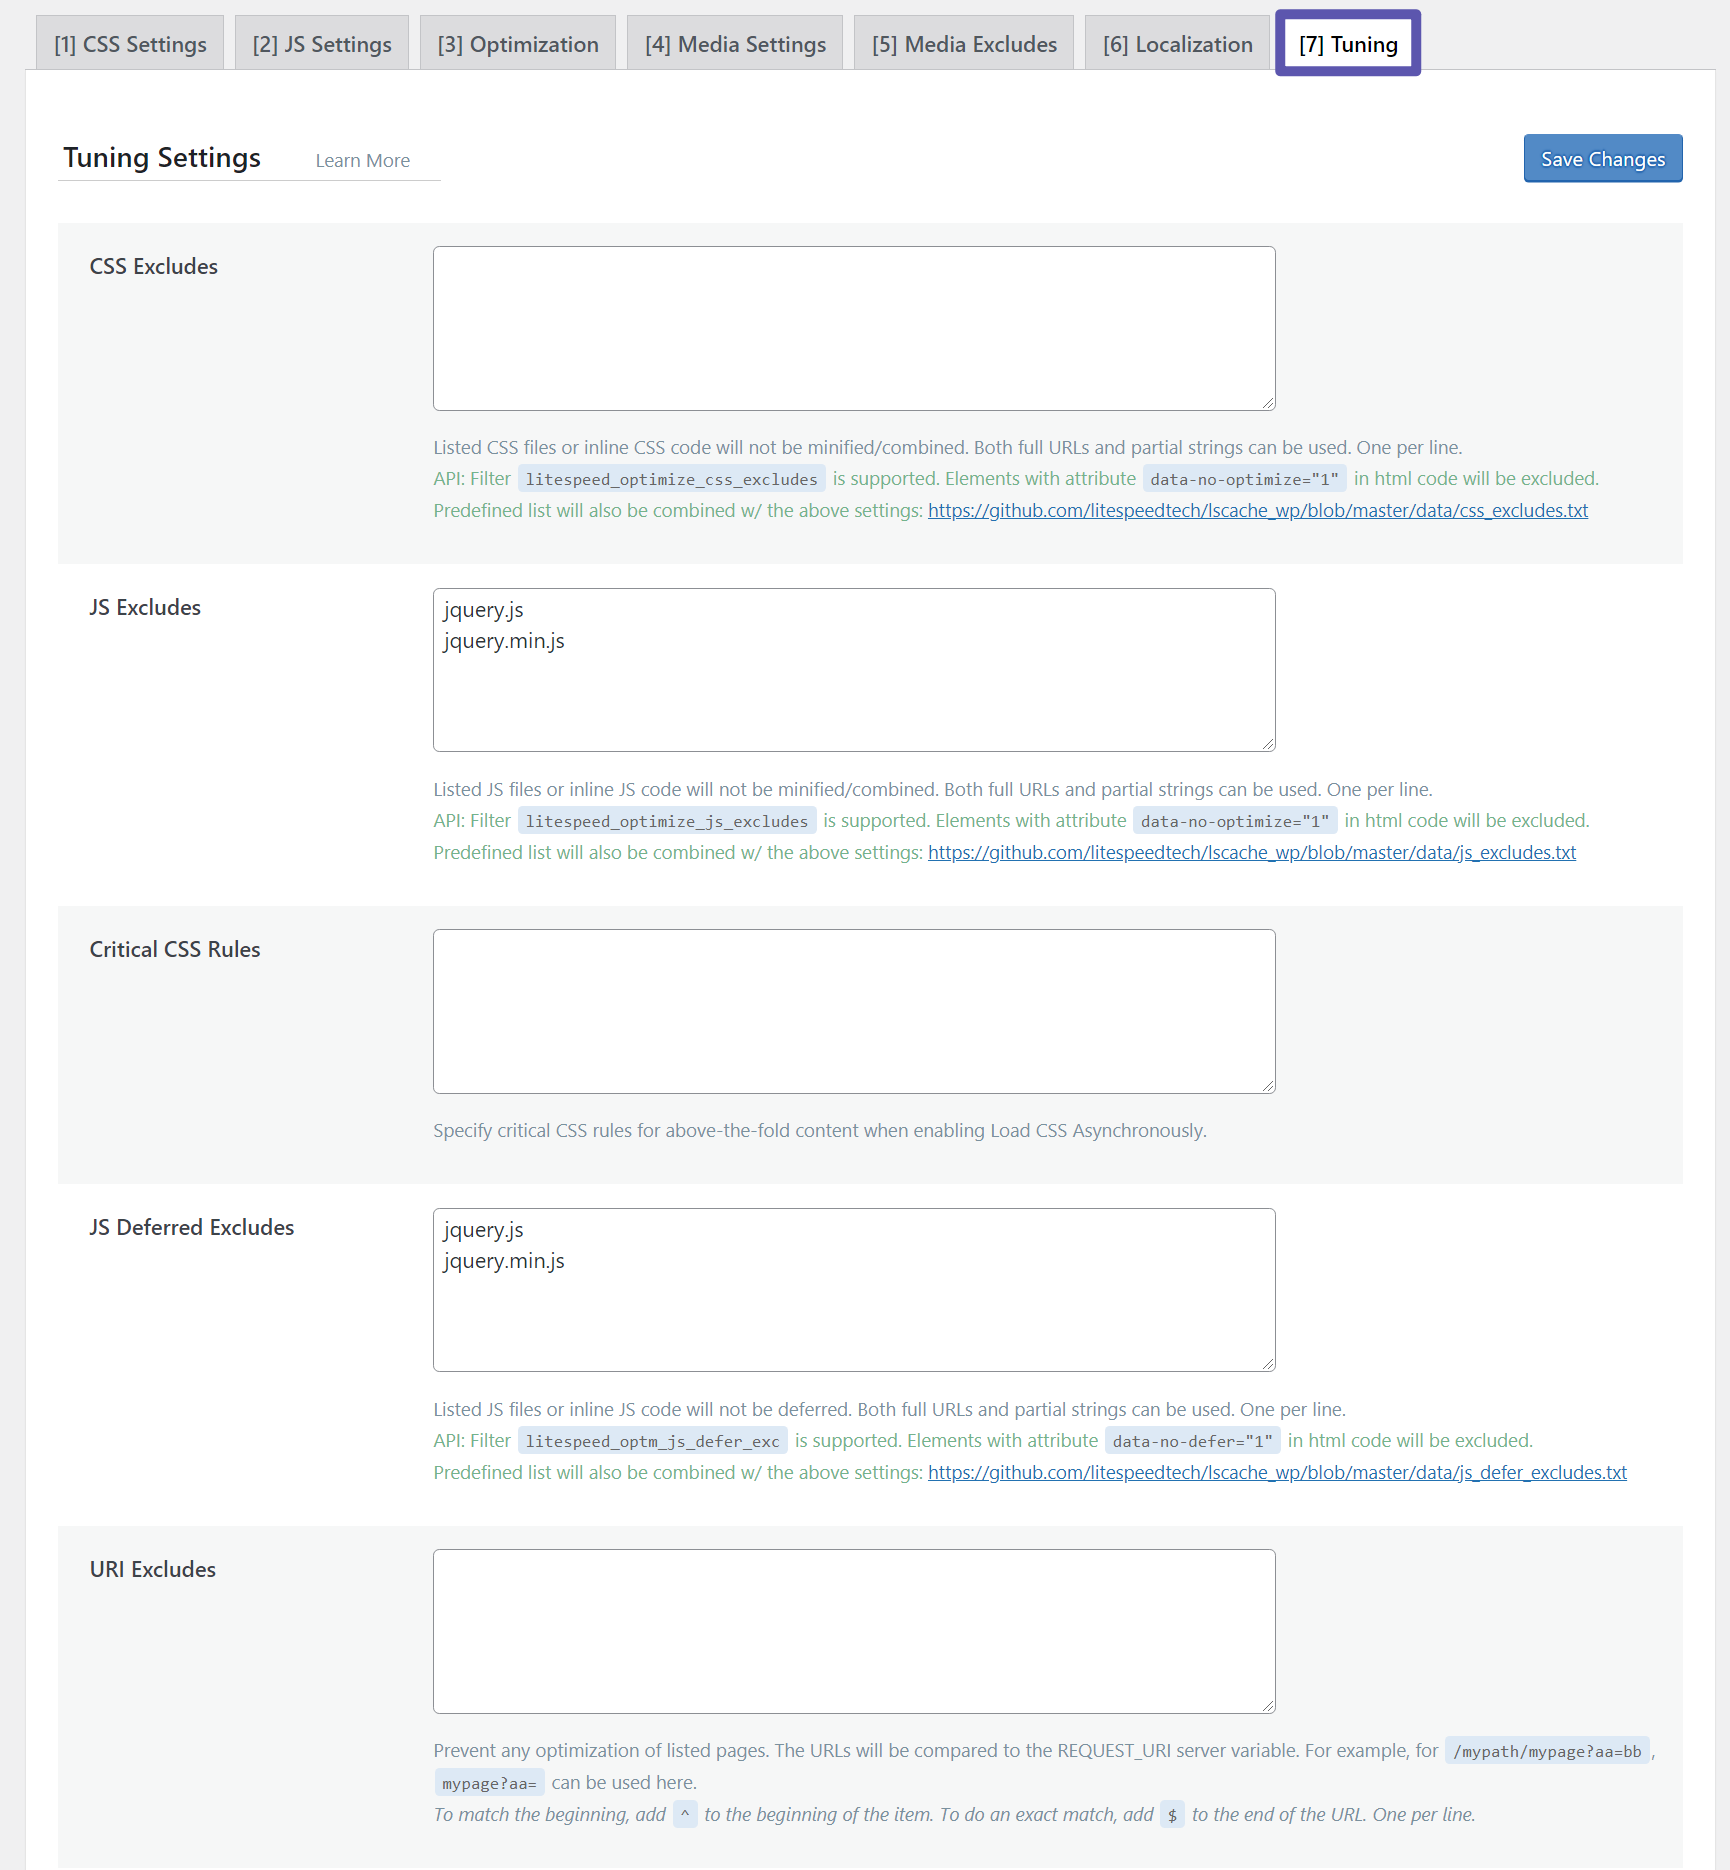
Tuning
The Tuning tab lets you manually exclude certain CSS or JavaScript files from optimization (which you configured in the CSS Settings and JavaScript Settings tabs).
This can be useful for debugging issues, but you don't need to change anything here if you aren't having problems.
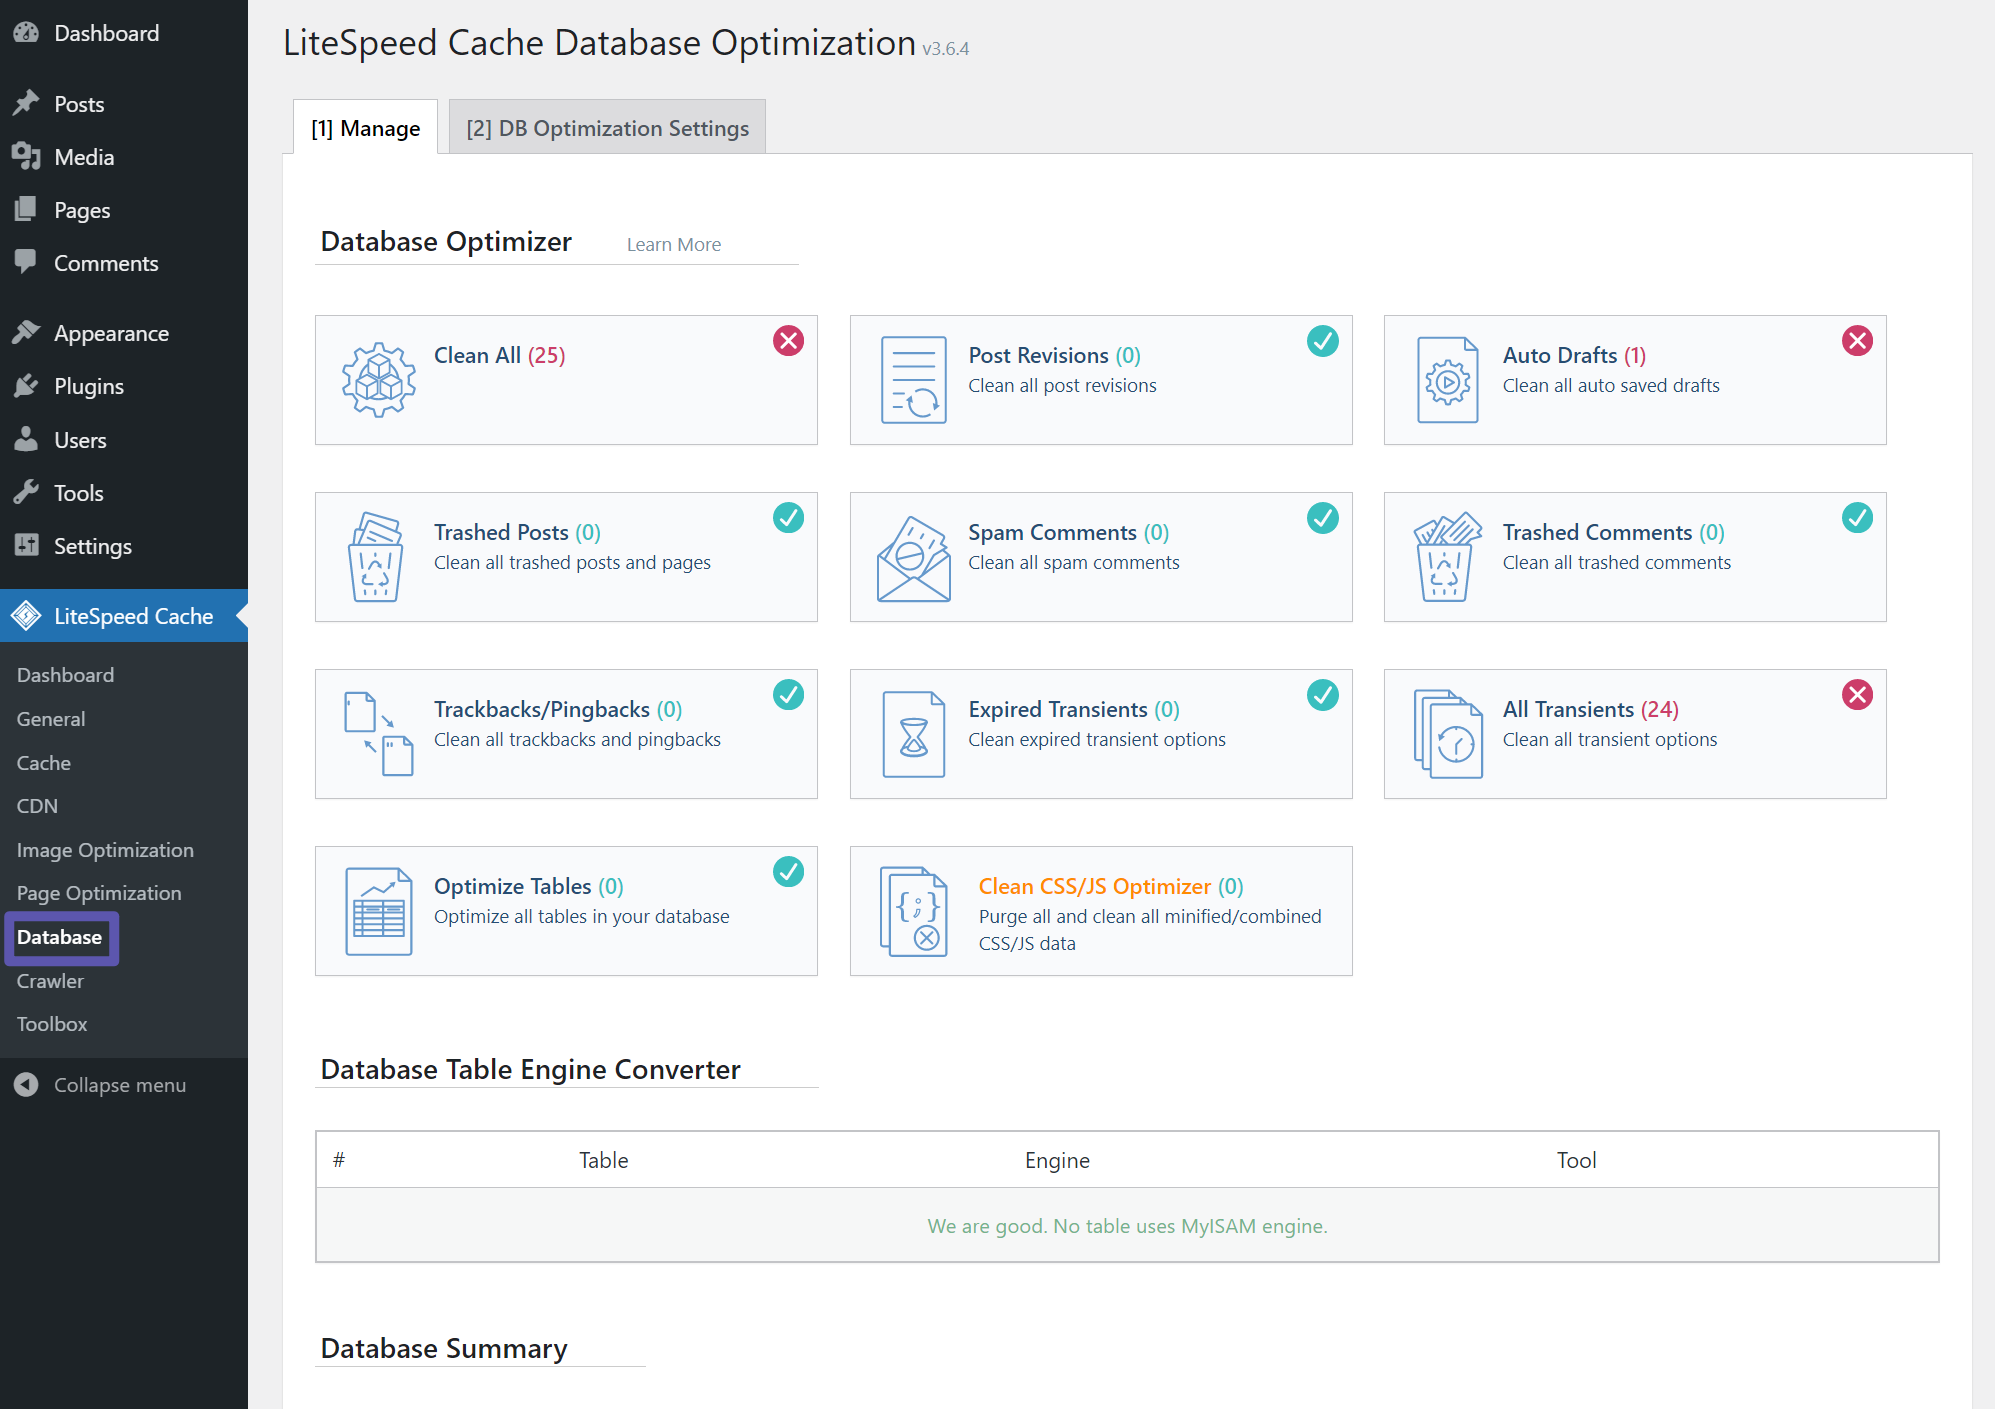
Database
The Database tab helps you clean out "gunk" that accumulates in your site's database.
It's safe to clean all of the options here. However, double-check your auto drafts before deleting them so that you don't accidentally delete drafts that you might need.
If you like to keep a certain number of post revisions, you can also set that up from the DB Optimization Settings tab.
Crawler
The Crawler area lets you configure cache preloading behavior. Normally, your site will only load a page into the cache when someone visits it. With cache preloading, you can "crawl" your site to load pages into the cache without waiting for a visit, which ensures that even the first visitor to a page still sees cached content.
However, this crawler can consume a lot of server resources. So - unless you know what you're doing here, you should just leave these as the defaults (which is disabled).
Toolbox
The Toolbox area includes one very helpful option - the ability to purge some or all of your cache.
If you're ever experiencing issues on your site (such as a change not showing up or something looking weird), we always recommend purging your cache before doing anything else.
Purging the cache will essentially "reset" your site, which solves a lot of issues:
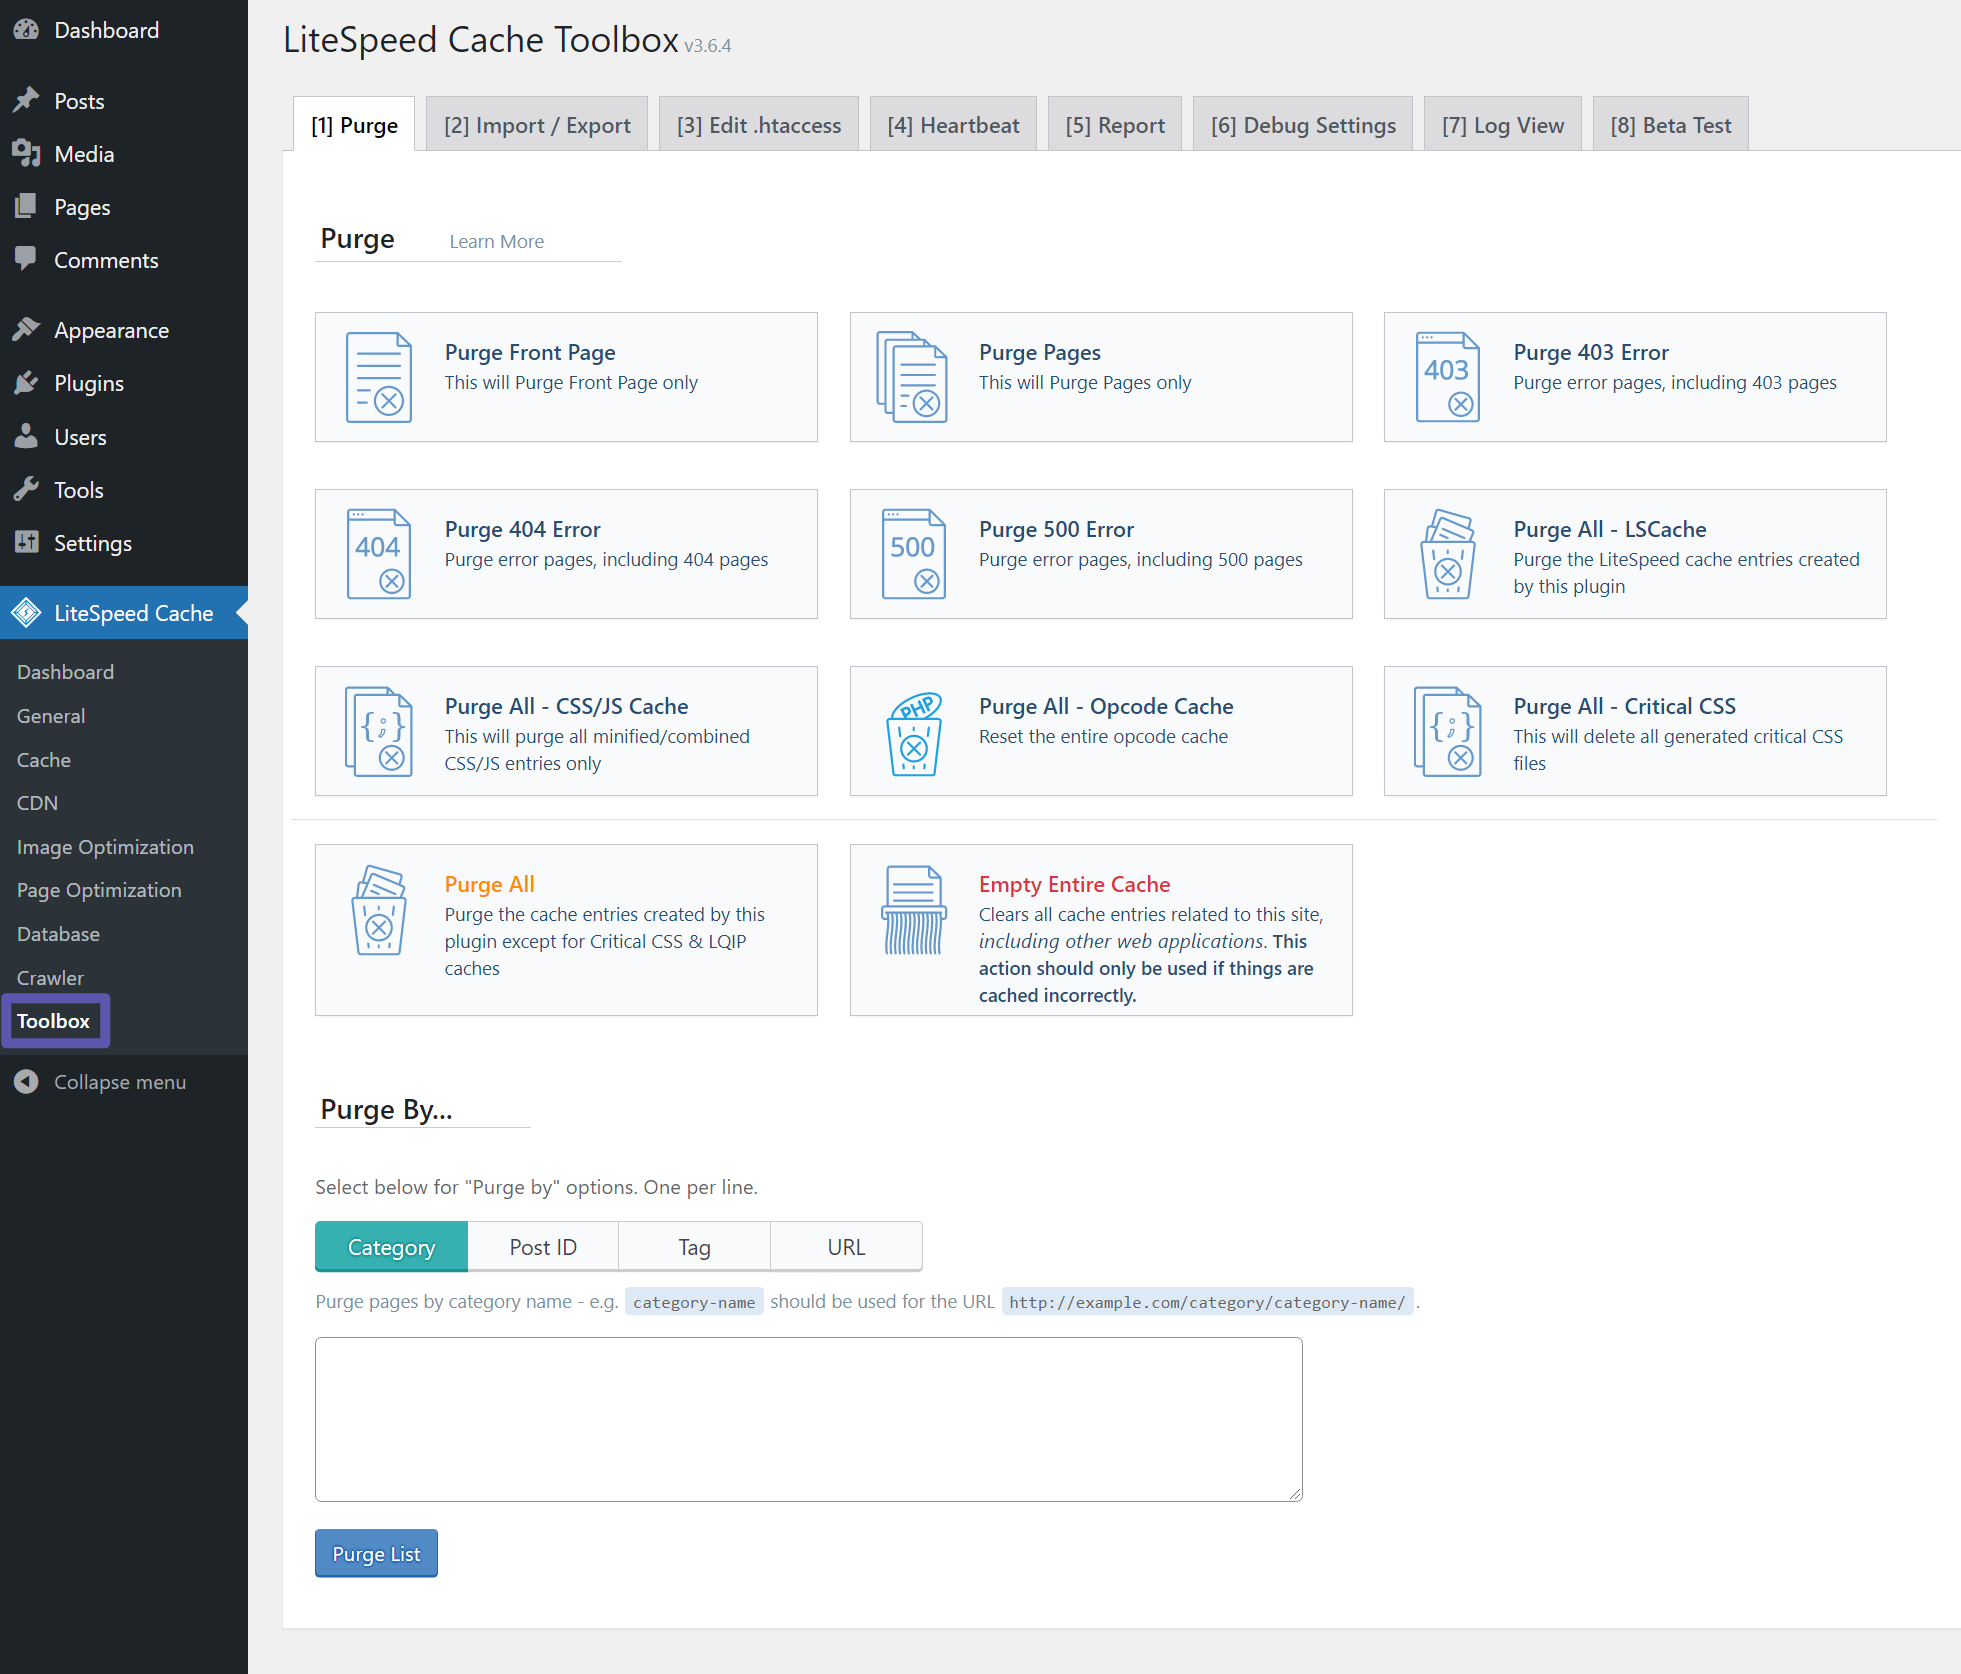
You get a lot of other tabs here, but you can ignore most of them.
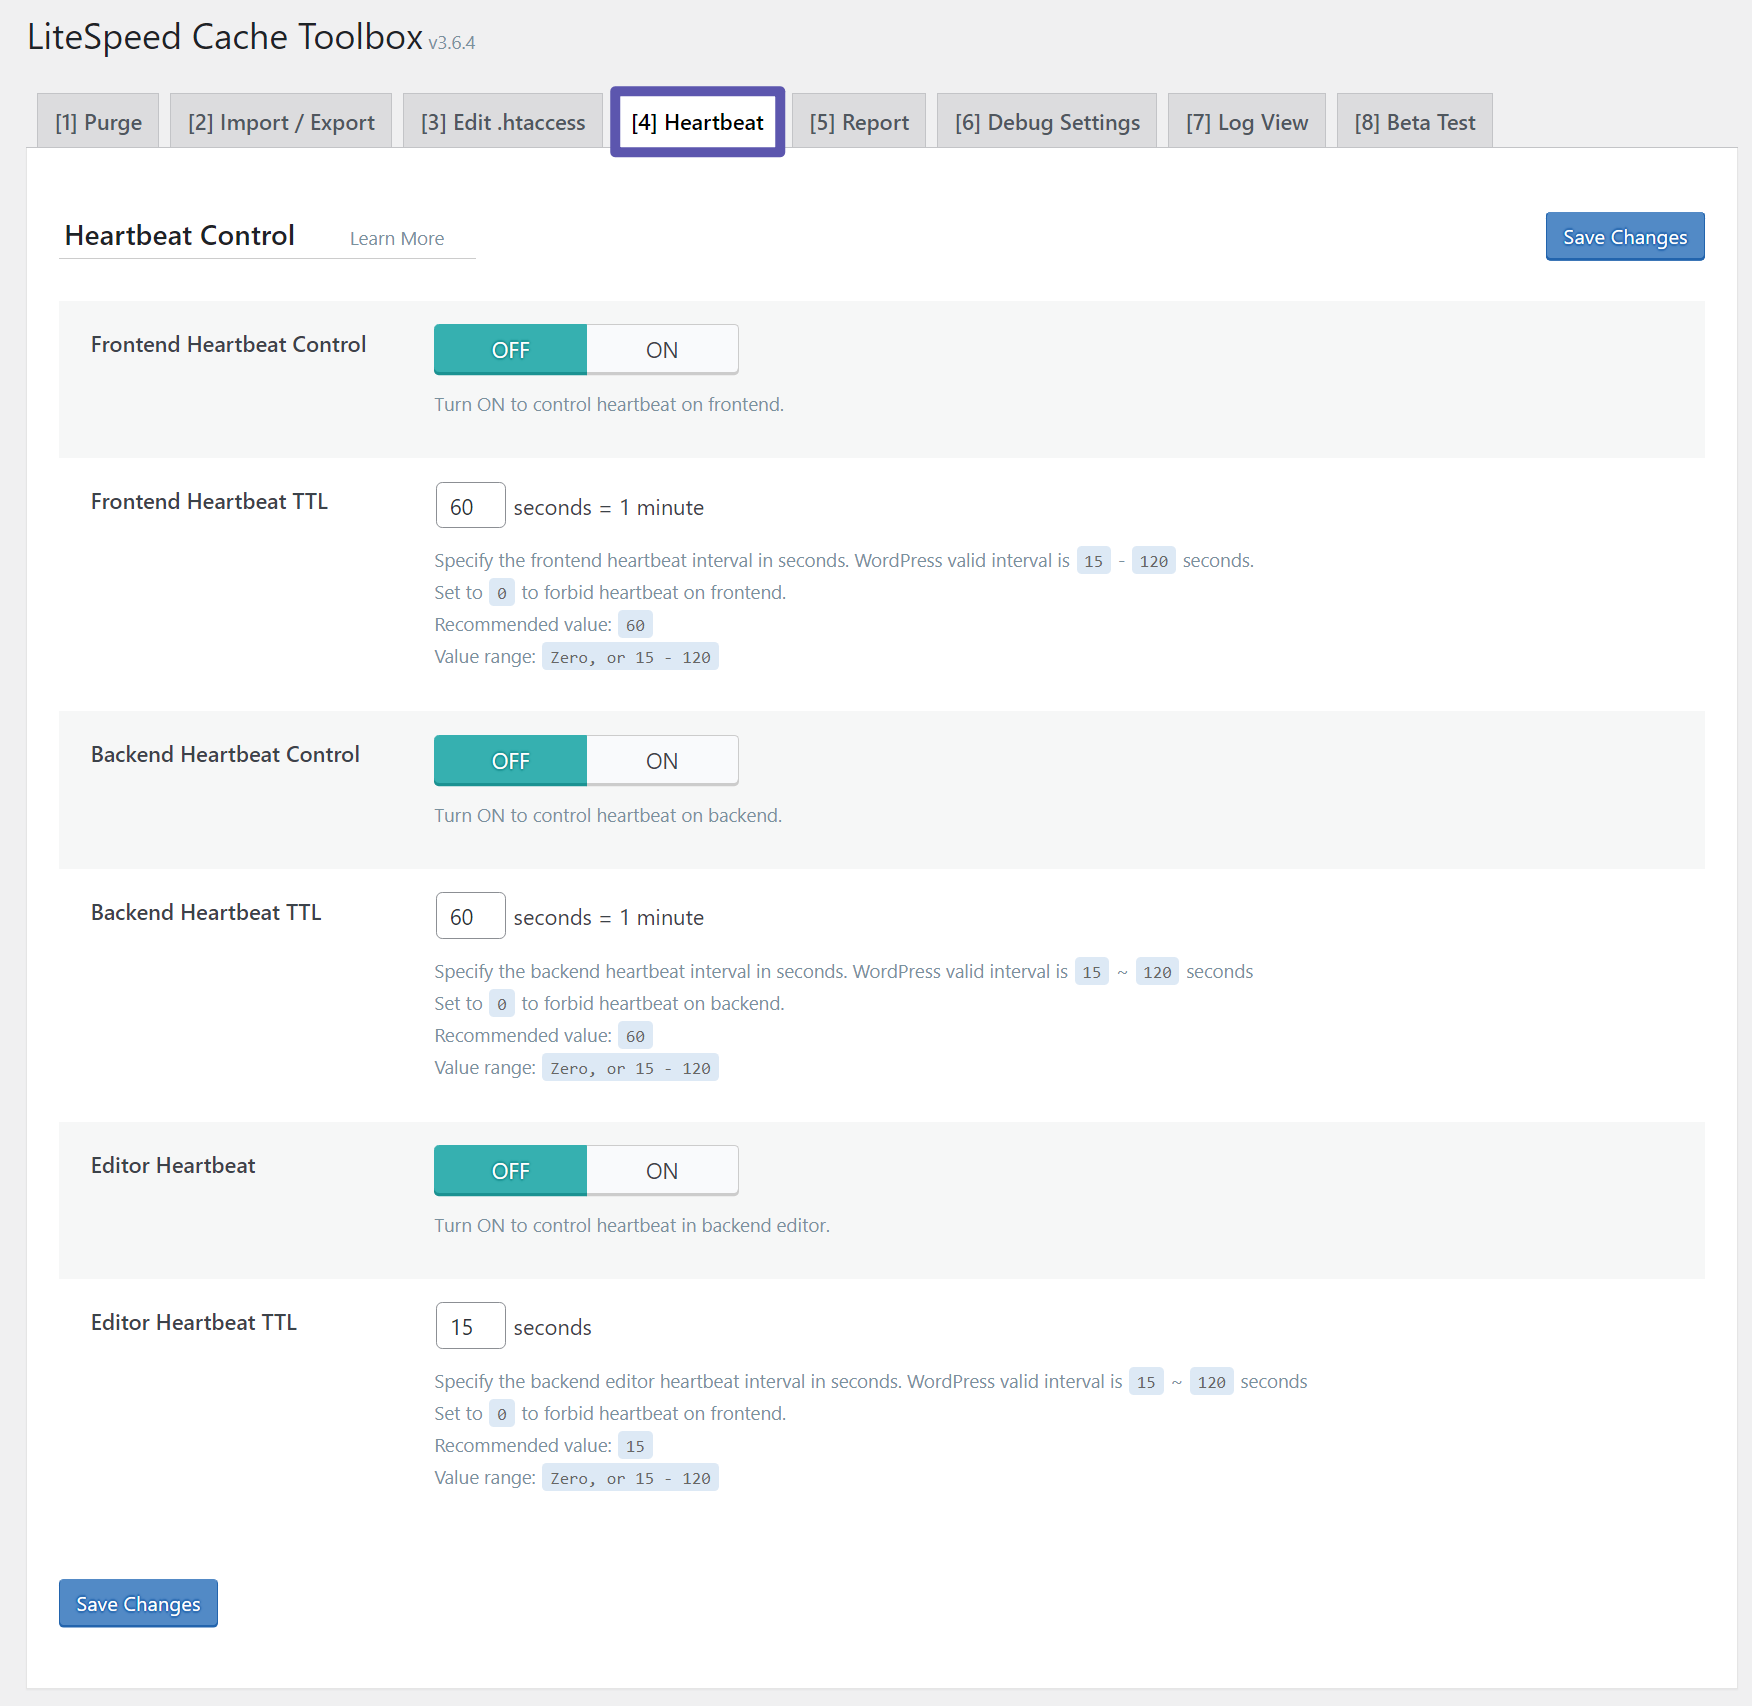
One tab you might want to look at is the Heartbeat tab, which lets you control the Heartbeat API.
The Heartbeat API is responsible for some automatic actions on your site - most notably auto-saves in the editor. However, it also consumes server resources, so some people like to limit its usage, which you can do from this tab.
And that's it! You should now be enjoying much faster WordPress load times thanks to LiteSpeed Cache.
Speed Up WordPress With LiteSpeed Cache Today
Whether or not your host uses LiteSpeed Web Server, the LiteSpeed Cache plugin offers a comprehensive way to speed up all aspects of your WordPress site.
If you host with Krystal, you'll be able to benefit from every single feature in the plugin, including LiteSpeed Cache's speedy server-level page caching features.
If your host doesn't use LiteSpeed Web Server, you can have us migrate your site to Krystal for free so that you can experience the full benefits of LiteSpeed Cache.
Still have questions about the best LiteSpeed Cache settings for WordPress? Let us know in the comments!
If you want to find out more about the personalised help that our Managed WordPress hosting customers receive, feel free to get in touch via Live Chat.
Share this article
About the author

Darren H
I'm Darren and I'm the Senior Copywriter at Krystal. Words are what I do. Aside from writing, I play guitar and sing in my band Machineries Of Joy and seek adventure with my wife and daughter.