Sometimes, having a single site isn’t enough - you might need a range of them for various purposes, such as catering to different target markets or operating multiple online stores. However, you’ll be glad to know that you won’t have to keep track of different login credentials for each website.
That’s because using a WordPress multisite removes much of the complexity involved in managing multiple websites. Some website owners take this concept one step further too, and create a WooCommerce multisite network of online stores. If a multisite sounds like something you need but you aren’t sure how to implement one, don’t fret!
Read on as we cover WordPress and WooCommerce multisites (including the differences between the two), and how you can set them up, step by step. By the end of this guide, you’ll know how to create a multisite network that meets your needs, and the right platform for building your multisite on. Let’s get started.
What is a WordPress multisite?
A WordPress multisite is a network of websites being run from a single WordPress installation. This allows you to manage all these websites (or “subsites”) using just one WordPress dashboard and a Super Admin user role. It also means not having to remember and use separate login details for each of your websites, which can be quite a pain.
Of course, this doesn’t necessarily mean that the websites in your multisite network have to look identical. While your subsites will share the same WordPress installation, you can configure each website separately so they have their own unique look and functionalities.
Other advantages of using a WordPress multisite include:
- Being able to share themes and plugins across your multisite, such as the WooCommerce ecommerce plugin for the creation of a WooCommerce multisite (more on this shortly!)
- Pushing updates to multiple websites at the same time, instead of rolling them out on each website one by one. This helps you save not only time, but development expenses as well.
- Using domain mapping to run multiple websites with localised content, to better appeal to audiences from different countries and cultures.
What is a WooCommerce multisite?
While a WordPress multisite is a network of websites that share one WordPress installation, a WooCommerce multisite (also known as a WooCommerce multistore) is a network of websites that all run the same WordPress installation AND the WooCommerce ecommerce plugin.
In practice, what this means is that a WooCommerce multisite is essentially multiple online WooCommerce stores being run on the same WordPress multisite network. However, you’ll be able to manage each sub-store individually and independently from each other.
What can you use a WooCommerce multisite for?
Most ecommerce store owners need just one WooCommerce store. However, there are certain situations where having a WooCommerce multisite makes sense. With a WooCommerce multisite, for example, you’ll be able to:
- Offer an online “shopping mall” experience by creating and linking together a network of store websites, each selling different products.
- Create a store network where users can set up their own online store and sell their products, while you manage the tech backend for their stores on their behalf. If you’re familiar with the Etsy marketplace, you’ll know what we’re talking about here!
- Manage multiple online stores under one roof, especially if you run a business that operates multiple brands and has a separate store for each of them.
- Maintain several client ecommerce stores through one dashboard, which is handy if you are a developer or agency.
How to create your own multisite
WordPress doesn’t make the option of creating a WordPress multisite readily available. Instead, you’ll need to go through some steps to enable the multisite feature for your WordPress website. This can sound daunting, but we’ll walk you through the process. Then, once you have your WordPress multisite set up, you can install WooCommerce on it to make it a WooCommerce multistore.
1. Set up a WordPress website and ensure you have FTP access to it

Obviously, you’ll need to have a WordPress website before you can create a WordPress multisite (or a WooCommerce one). If you don’t already have a WordPress website, take this opportunity to invest in a solid managed web hosting service that can handle the technical demands of running a WordPress multisite.
For example, look for a web host that can withstand the sheer volume of traffic and activity that comes with operating multiple websites on one WordPress installation. Our Managed WordPress hosting is a strong choice in this regard: it’s equipped to meet the needs of high-traffic websites, and offers ultra-fast page loading speeds and top-notch security.
Once you have your WordPress website set up, check that you have File Transfer Protocol (FTP) access to it. This is because you may need to access your website files via FTP to set up your multisite. FileZilla is a popular FTP client for this purpose, and you can learn how to use it here.
2. Back up your website before making any changes
If you follow our steps down to the letter, you shouldn’t run into any issues when setting up your WordPress multisite. However, we’d still recommend saving a backup of your website beforehand in case you need it.
Most web hosts will offer automated website backups, so this is a good starting point. As an example, our Managed WordPress hosting automatically backs up your website every day, and you’ll have access to the last 30 days’ worth of backups.
Depending on when the automated backup was last taken, however, it might not have captured the most updated state of your website. So we suggest doing your own backup of your website just before you start setting up your multisite. Using a WordPress backup plugin works great for this purpose, while you can also do a manual backup if you prefer.
3. Decide whether to use domains, subdomains or subdirectories for your WordPress multisite
What’s the difference between the three? Here’s a quick rundown:
- A domain is what people will typically use to access your website. For example, this could be “example.com”. You may want to set up different domains for your multisite if your subsites will have different country code top-level domains, such as “example.com” and “example.co.uk”.
- A subdomain is a domain that is separate, but part of, another domain. Subdomains can be used to host a blog, shop or some other website section separately from your main site. They will be treated as standalone websites from your main site for search engine optimisation (SEO) purposes. An example of a subdomain is “blog.example.com”.
- A subdirectory is a folder of content within an existing domain. For this reason, subdirectories are also known as subfolders. You’d use subdirectories if you want to create a hierarchy of content within a particular domain, instead of splitting the content across multiple domains or subdomains. One example of a subdirectory is “example.com/blog”.
Depending on the intended use of your multisite, you may also need to take extra steps. For example, if you want to allow users to create their own subsites that will be parked under subdomains, then you’ll need to configure wildcard subdomains.
On the other hand, if you’ll be setting different domains for each subsite, then you’ll have to map your domains and update their nameserver records in your domain registrar account.
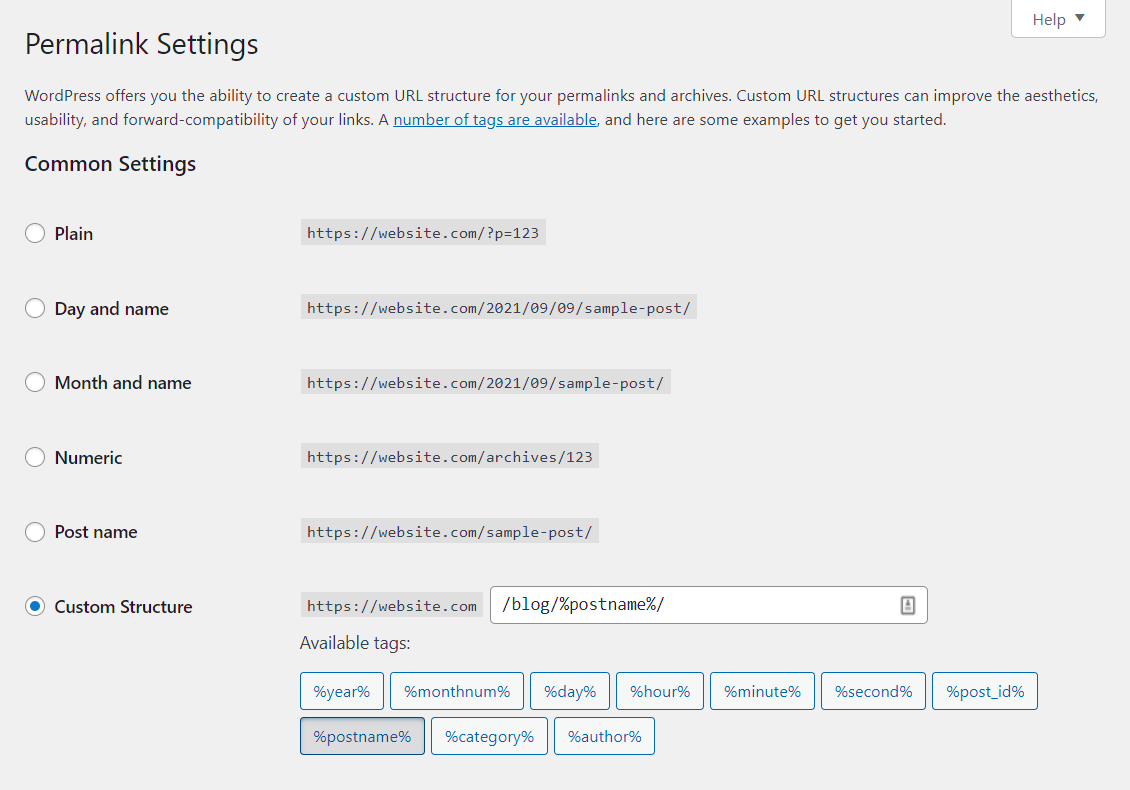
4. Activate pretty permalinks for your website

Permalinks are the “permanent links” that you’ll use to access your web pages. By default, WordPress permalinks can be rather ugly, in the form of appearing as “example.com/?p=123”. So you’ll want to “prettify” your permalinks and make them more readable, such as “example.com/blog/hello-world”. This not only makes your permalinks easier for your visitors to read and use, but also helps search engines to better understand what your web page is about.
Check out this WordPress article to learn how to customise permalinks from your WordPress dashboard.
5. Enable multisite for your WordPress multisite installation
With all of the above completed, it’s time to start setting up your WordPress multisite!
First, deactivate all active plugins on your website. After that, use an FTP client to download your website’s wp-config.php file. Add this code snippet to it:
/* Multisite */
define( 'WP_ALLOW_MULTISITE', true );
This snippet should go above the line that says “/* That's all, stop editing! Happy publishing. */”.
Save your wp-config.php file and upload it back to the server using your FTP client.
6. Install your WordPress network
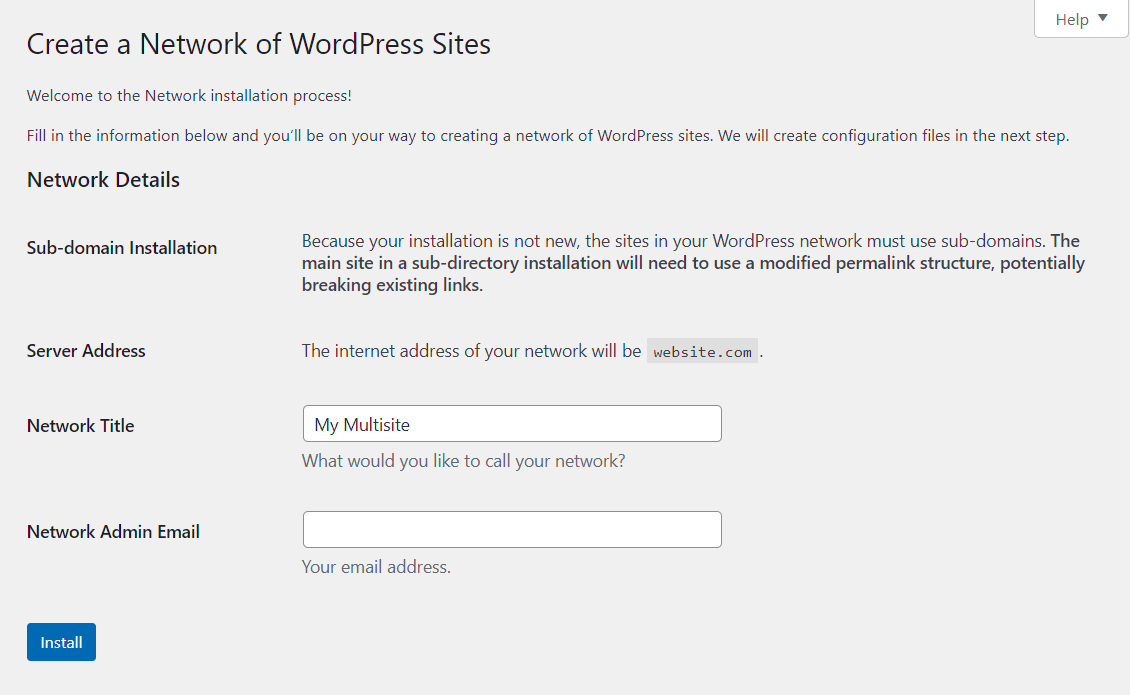
Under the Tools option in your WordPress dashboard, you should now have a new setting called “Network Setup”.
Click on that, and you’ll see a screen that looks something like this. (Depending on your WordPress installation, the exact text that you see may differ.)

You’ll then have to:
- Set the domain structure for your multisite network, such as subdomains or subdirectories.
- Name your WordPress multisite.
- Enter your network admin’s email address (make sure it’s accurate!)
When you’re done, click the Install button to set up your WordPress network.
7. Enable your WordPress network
With the installation complete, you’ll get two code snippets. One of them is to be added to your wp-config.php file, while the other is to be added to your .htaccess file. You can use either your FTP client or the cPanel file manager to retrieve these files and add the code snippets to them.
8. Set up your WordPress network
After you’ve enabled your multisite network, click on “Settings” in the WordPress sidebar, followed by “Network Settings”. In the Network Settings screen, you’ll be able to configure settings such as:
- Whether users can register new user accounts and/or subsites in your network
- Restricting file uploads to certain file types or a maximum file size
- Whether users can access their subsite’s WordPress plugin admin panel
To add new subsites to your network, click on “My Sites” in your WordPress header menu, followed by “Network Admin” and “Sites”. Go ahead to customise your subsites’ themes, plugins and content and build out your multisite. If you intend to build a WooCommerce multistore, then don’t forget to install the WooCommerce plugin too!
For more information on setting up a multisite, check out WordPress’ guide on this subject.
Make your WordPress and WooCommerce multisites a reality with Krystal
If you’re itching to operate not just one, but multiple websites, then setting up a WordPress multisite may be just the solution for you. You’ll be able to conveniently manage multiple websites from one dashboard, and pack each of them with unique content to cater to different target audiences. Throw in the WooCommerce plugin, and you can turn your multisite into an entire network of revenue-generating online stores. Ka-ching!
Of course, your multisite will need to be hosted on a powerful platform to ensure that your websites will load smoothly, no matter how many visitors are trying to access them at once. With features such as LiteSpeed caching, high-performance SSD storage and 99.99% guaranteed uptime, our Managed WordPress hosting is the ideal solution for multisite owners.
We offer various hosting plans that not only cater to all website needs, but can also scale along with your growing website empire. Take a look at our Managed WordPress hosting plans today.
Share this article
About the author
Darren H
I'm Darren and I'm the Senior Copywriter at Krystal. Words are what I do. Aside from writing, I play guitar and sing in my band Machineries Of Joy and seek adventure with my wife and daughter.